Hitachi 42HDT79 Owners Guide - Page 70
Source, use the CURSOR PAD
 |
View all Hitachi 42HDT79 manuals
Add to My Manuals
Save this manual to your list of manuals |
Page 70 highlights
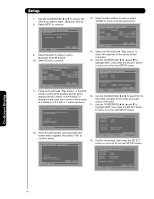
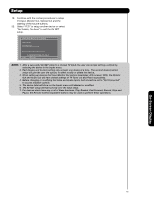
Setup 15. If you would like to label your A/V Receiver Source, use the CURSOR PAD ̇ or ̈ to highlight " Yes " then press the SELECT button to continue. Selecting " No " will bypass the Source labeling. AV Net Setup Wizard : A/V Receiver Setup Brand Name IR Code Set TV Input Monitor Out Optical Out Hitachi (44/54) 3 (3/12) Not Connected Not Connected Not Connected Would you like to relabel the Source buttons? Back No Move SEL Select Yes 16. Use the CURSOR PAD ̆ or ̄ to select your A/V Receiver Sources. 17. Use the CURSOR PAD ̇ or ̈ to label your A/V Receiver Sources. 18 Use the CURSOR PAD ̇, ̈, ̆ and ̄ to highlight NEXT, then press the SELECT button to move on to the next SETUP screen. AV Net Setup Wizard : A/V Receiver Setup Source Settings Source Source 1 Source 2 Source 3 Source 4 Source 5 Source 6 Source 7 Source 8 Source 9 Source 10 Name Back Move Change Name SEL Select Next 19. Confirm all settings, then press the SELECT button to move on to the next SETUP screen. AV Net Setup Wizard : A/V Receiver Setup Brand Name IR Code Set TV Input Monitor Out Optical Out Hitachi (44/54) 3 (3/12) Not Connected Not Connected Not Connected All settings are complete! Move SEL Select Back Next 20. Press SELECT to setup another device or use the CURSOR PAD ̇ or ̈ to highlight " No thanks, I'm done ", then press the SELECT button to exit the AV NET SETUP. AV NET SETUP WIZARD ( Example: DVD Setup ) 1. Press the SELECT button to start the SETUP WIZARD. AV Net Setup Wizard Welcome to the AV Net Setup Wizard. Before starting this wizard, please make sure that all devices are connected appropiately and the IR blasters are placed in front of the devices IR sensor. Move SEL Return Back Start 2. Use the CURSOR PAD ̆ or ̄ to highlight NO. 3. Press the SELECT button to select. (Select NO to setup other devices). 4. Use the CURSOR PAD ̇, ̈, ̆ and ̄ to highlight NEXT, then press the SELECT button to move on to the next SETUP screen. AV Net Setup Wizard : A/V Receiver Setup Do you want to use an A/V Receiver? Yes No Move SEL Select Back Next 5. Use the CURSOR PAD ̇, ̈, ̆ and ̄ to highlight the device. ( Example : DVD Setup ). 6. Press the SELECT button to select. 7. Use the CURSOR PAD ̇, ̈, ̆ and ̄ to highlight NEXT, then press the SELECT button to move on to the next SETUP screen. AV Net Setup Wizard : Device Settings Device Settings Please select a device. DVD Cable DVD Recorder VCR Custom ✓ Device is set. DVD2 Satellite PV Recorder VCR2 Move SEL Select Back Next On-Screen Display 70 AV Net Setup Wizard : A/V Receiver Setup Congratulations! Your A/V Receiver is now connected to your AV network. Would you like to setup another device? Move No thanks, I'm done. SEL Select Yes
-
 1
1 -
2
-
3
-
4
-
5
-
6
-
7
-
8
-
9
-
10
-
11
-
12
-
13
-
14
-
15
-
16
-
17
-
18
-
19
-
20
-
21
-
22
-
23
-
24
-
25
-
26
-
27
-
28
-
29
-
30
-
31
-
32
-
33
-
34
-
35
-
36
-
37
-
38
-
39
-
40
-
41
-
42
-
43
-
44
-
45
-
46
-
47
-
48
-
49
-
50
-
51
-
52
-
53
-
54
-
55
-
56
-
57
-
58
-
59
-
60
-
61
-
62
-
63
-
64
-
 65
65 -
 66
66 -
 67
67 -
 68
68 -
 69
69 -
 70
70 -
 71
71 -
 72
72 -
 73
73 -
 74
74 -
 75
75 -
76
-
77
-
78
-
79
-
80
-
81
-
82
-
83
-
84
-
85
-
86
-
87
-
88
-
89
-
90
-
91
-
92
-
93
-
94
-
95
-
96
-
97
-
98
-
99
-
100
-
101
-
102
-
103
-
104
 |
 |
