Hitachi 55DMX01W Owners Guide - Page 9
Front Input Jacks For Video: 3 And Pc2 Audio
 |
View all Hitachi 55DMX01W manuals
Add to My Manuals
Save this manual to your list of manuals |
Page 9 highlights
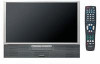
FRONT PANEL CONTROLS ቦ POWER Light This light is on during normal operation. Light Blinking Slowly (2 seconds): Rear Projection Television lamp is cooling down. It takes 12-15 seconds to warm up and about 2 minutes to cool down. ቧ POWER Button Press this button to turn the TV on or off. ቨ FRONT INPUT JACKS (for VIDEO: 3 and PC2 AUDIO) Use these audio/video jacks for a quick hook-up from a camcorder or VCR to instantly view your favorite show or new recording. Press the INPUT button until VIDEO: 3 appears in the top right corner of the TV screen. If you have mono sound, insert the audio cable into the left audio jack. VIDEO: 3 audio input jacks can be used for PC2 audio when a PC is connected to front input VIDEO: 3 jack. When using S-Video cable on the front panel, make sure the arrow (Ȇ) marking on the S-Video cable points to the left, to properly insert the S-Video cable into your television. ቩ PC INPUT 2 (Front) Use this 15 pin D-Sub input for a quick hook up from your PC connection. ቪ TV/PC Button Press this button to switch from TV, PC INPUT 1 (PC1) and PC INPUT 2 (PC2). Your selection is shown in the top right corner of the screen. ቫ INPUT/EXIT Button Press this button to select the current antenna source, VIDEO: 1, 2, 3 or alternate antenna source. Your selection is shown in the top right corner of the screen. This button also serves as the EXIT button when in MENU mode. NOTE: COMPONENT INPUT takes priority over S-VIDEO input, and S-VIDEO input takes priority over VIDEO input. ቭ MENU Button This button allows you to enter the MENU, making it possible to set TV features to your preference without using the remote. This button also serves as the SELECT button when in menu mode. ቮ VOLUME Level Press these buttons for your desired sound level. The volume level will be displayed on the TV screen. These buttons also serve as the cursor left (ǡ) and right (Ǡ) buttons when in MENU mode. ቯ CHANNEL Selector Press these buttons until the desired channel appears in the top right corner of the TV screen. These buttons also serve as the cursor down (Ĭ) and up (į) buttons when in MENU mode. NOTES: 1. INDICATOR LAMP LED INDICATION LIGHT ON BLINKING MEANING NO LAMP LIGHT or BROKEN LAMP WRONG LAMP UNIT ASSEMBLY ACTION Need to exchange if LAMP still does not light by Power On again. Check assembly condition of LAMP UNIT TEMP LED LIGHT ON BLINKING Too Hot inside the OPTIC unit COOLING FAN STOPPED Call Service POWER LIGHT ON SLOWLY BLINKING NORMAL OPERATION COOL DOWN 2. If the LAMP, TEMP, and POWER LED are blinking in the order below, the Rear Projection Television is warming up. LAMP TEMP POWER 9
-
 1
1 -
2
-
3
-
 4
4 -
 5
5 -
 6
6 -
 7
7 -
 8
8 -
 9
9 -
 10
10 -
 11
11 -
 12
12 -
 13
13 -
 14
14 -
15
-
16
-
17
-
18
-
19
-
20
-
21
-
22
-
23
-
24
-
25
-
26
-
27
-
28
-
29
-
30
-
31
-
32
-
33
-
34
-
35
-
36
-
37
-
38
-
39
-
40
-
41
-
42
-
43
-
44
-
45
-
46
-
47
-
48
-
49
-
50
-
51
-
52
-
53
-
54
-
55
-
56
-
57
-
58
-
59
-
60
-
61
-
62
-
63
-
64
-
65
-
66
-
67
-
68
-
69
-
70
-
71
-
72
-
73
-
74
-
75
-
76
-
77
-
78
-
79
-
80
-
81
-
82
-
83
-
84
-
85
-
86
-
87
-
88
-
89
-
90
-
91
-
92
 |
 |
