Hitachi M12V2 Instruction Manual - Page 11
Installing And Removing Bits, Warning - router
 |
UPC - 717709010376
View all Hitachi M12V2 manuals
Add to My Manuals
Save this manual to your list of manuals |
Page 11 highlights
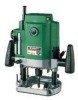
English INSTALLING AND REMOVING BITS WARNING: Be sure to switch power OFF and disconnect the plug from the receptacle to avoid serious trouble. 1. Installing bits (1) Clean and insert shank of bit into the collet chunk until shank bottoms, then back it out approximately 1/16" (approx. 2 mm). (2) With the bit inserted and pressing the lock pin holding the armature shaft, use the 23 mm wrench to firmly tighten the collet chuck in a clockwise direction (viewed from under the router). (Fig. 2) (3) When using the 1/4" diameter shank bit, replace the equipped collet chuck with the one for 1/4" diameter shank bit which is provided as the standard accessory. Lock pin Wrench Loosen Tighten Fig. 2 CAUTION: ⅷ Ensure that the collet chuck is firmly tightened after inserting a bit. Failure to do so will result in damage to the collet chuck. ⅷ Ensure that the lock pin is not inserted into the armature shaft after tightening the collet chuck. Failure to do so will result in damage to the collet chuck, lock pin and armature shaft. 2. Removing bits When removing the bits, do so by following the steps for installing bits in reverse order. CAUTION: ⅷ Ensure that the lock pin is not inserted into the armature shaft after tightening a bit. Failure to do so will result in damage to the collet chuck, lock pin and armature shaft. 11
-
 1
1 -
2
-
3
-
4
-
5
-
 6
6 -
 7
7 -
 8
8 -
 9
9 -
 10
10 -
 11
11 -
 12
12 -
 13
13 -
 14
14 -
 15
15 -
 16
16 -
17
-
18
-
19
-
20
-
21
-
22
-
23
-
24
-
25
-
26
-
27
-
28
-
29
-
30
-
31
-
32
-
33
-
34
-
35
-
36
-
37
-
38
-
39
-
40
-
41
-
42
-
43
-
44
-
45
-
46
-
47
-
48
-
49
-
50
-
51
-
52
-
53
-
54
-
55
-
56
-
57
-
58
-
59
-
60
 |
 |
