Hitachi M12V2 Instruction Manual - Page 12
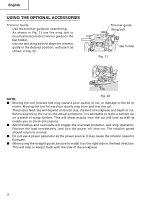
How To Use The Router - accessories
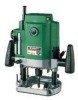 |
UPC - 717709010376
View all Hitachi M12V2 manuals
Add to My Manuals
Save this manual to your list of manuals |
Page 12 highlights
English HOW TO USE THE ROUTER 1. Adjusting depth of cut (1) Place the tool on a flat wood surface. (2) Turn the quick adjustment lever in a counterclockwise direction until the quick adjustment lever stops. (Fig. 4) (3) Turn the stopper block so that section to which the cutting depth setting screw on a stopper block is not attached comes to the bottom of the stopper pole. Loosen pole lock knob allowing the stopper pole to contact with stopper block. (4) Loosen the lock lever and press the tool body until the bit just touches the flat surface. Tighten the lock lever at this point. (Fig. 5) (5) Tighten pole lock knob. Align the depth indicator with the "0" graduation of scale. (6) Loosen pole lock knob, and raise until indicator aligns with the graduation representing the desired cutting depth. Tighten pole lock knob. (7) Loosen the lock lever and press the tool body down until the stopper block to obtain the desired cutting depth. Stopper pole Quick Scale adjustment lever Stopper block Your router allows you to finely adjust depth of cut. (1) Attach the accessory knob to fine adjustment knob. (Fig. 6) (2) Turn the quick adjustment lever in a clockwise direction until the quick adjustment lever stops with the stopper screw. (Fig. 7) If the quick adjustment lever does not stop with the stopper screw, the bolt screw is not properly fitted. Loosen the lock lever If this occurs, slightly loosen the lock lever and press down on the unit (router) hard from the top and turn the quick adjustment lever again after properly fitting the bolt screw. (3) The depth of cut can be adjusted when the lock lever is loosened, by turning the fine adjustment knob. Turning the fine adjustment knob counterclockwise results in a shallower cut, whereas turning it clockwise results in a deeper cut. 12 Depth indicator Pole lock knob Fig. 3 Quick adjustment lever Fig. 4 Fig. 5 Knob Fine adjustment knob Fig. 6
-
 1
1 -
2
-
3
-
4
-
5
-
6
-
 7
7 -
 8
8 -
 9
9 -
 10
10 -
 11
11 -
 12
12 -
 13
13 -
 14
14 -
 15
15 -
 16
16 -
 17
17 -
18
-
19
-
20
-
21
-
22
-
23
-
24
-
25
-
26
-
27
-
28
-
29
-
30
-
31
-
32
-
33
-
34
-
35
-
36
-
37
-
38
-
39
-
40
-
41
-
42
-
43
-
44
-
45
-
46
-
47
-
48
-
49
-
50
-
51
-
52
-
53
-
54
-
55
-
56
-
57
-
58
-
59
-
60
 |
 |
