Hitachi SP18VAH Instruction Manual - Page 11
Electronic Sander Polisher Operation - 7 disc sander polisher
 |
UPC - 717709007680
View all Hitachi SP18VAH manuals
Add to My Manuals
Save this manual to your list of manuals |
Page 11 highlights
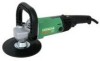
English 5. Confirming condition of the environment: Confirm that the work site is placed under appropriate conditions conforming to prescribed precautions. When sanding a thin steel plate, depending upon the state of the workbench, a loud noise will be created due to resounding noise from the steel plate being ground. To eliminate unwanted noise in this instance, place a rubber mat beneath the material to be ground. 6. Confirming and mounting the wool bonnet and sanding disc Confirm that the wool bonnet and sanding disc is mounted under the specified condition and is firmly clamped. For details, refer to the item "Assembling and Disassembling the Wool Bonnet and Sanding Disc". 7. Confirm the lock pin Confirm that the lock pin is disengaged by pushing lock pin two or three times before switching the power tool on. 8. Fixing the loop handle Fix the loop handle with a bolt and a washer to the gear cover. 9. Keep the Hook and Loop fastener clean Always keep the Hook and Loop fastener of the backing pad and sponge pad (Magic type) clean. If the Hook and Loop fastener becomes dirty, the sponge pad will separate possibly from the backing pad and fly off. ELECTRONIC SANDER POLISHER OPERATION Motor speed is increased by increasing pressure on the trigger. Release the trigger to stop. For continuous operation, pull the trigger and then push in the lock button. To stop the motor from the locked position, pull the trigger full, then release it. Motor speed can be varied as desired by rotating the dial: It is increased by turning the dial towards "6", decreased by turning it towards "1" (Fig. 2). Select the motor speed appropriate for the work being done. The following table gives the motor speeds corresponding to each indication on the dial scale and shows the types of work for which they are suitable. Dial Dial Indication 1 2 3 4 5 6 /min 600 1100 1700 2300 2900 3400 Type of works } For polishing } For sanding Lock Button Switch Trigger Fig. 2 When using the backing pad, use a dial setting of 4 or lower. CAUTION: The dial cannot be rotated further than the "6" or "1" on the scale in their respective directions. 11
-
 1
1 -
2
-
3
-
4
-
5
-
 6
6 -
 7
7 -
 8
8 -
 9
9 -
 10
10 -
 11
11 -
 12
12 -
 13
13 -
 14
14 -
 15
15 -
 16
16 -
17
-
18
-
19
-
20
-
21
-
22
-
23
-
24
-
25
-
26
-
27
-
28
-
29
-
30
-
31
-
32
-
33
-
34
-
35
-
36
-
37
-
38
-
39
-
40
-
41
-
42
-
43
-
44
-
45
-
46
-
47
-
48
 |
 |
