Honeywell 2092D Operation Guide - Page 5
Test Locking System - bolt down
 |
UPC - 016247020923
View all Honeywell 2092D manuals
Add to My Manuals
Save this manual to your list of manuals |
Page 5 highlights
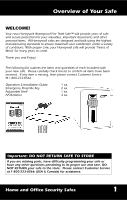
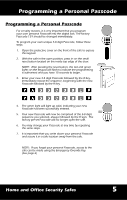
Test Locking System Electronic Locking System Test With the door still open, you can test the Electronic Digital Lock by manually activating the Locking System. To activate the Locking System, locate the Locking Push Button on the inside of the safe door, push it in and turn the handle downward to the left. This will cause the Live Bolts to extend out and into the "locked" position. Now with the door open and the Live Bolts in the locked position, you may proceed to Testing the Passcode. Extended Live Bolts LOCKING PUSH BUTTON Important: ENGAGING LIVE BOLTS Closing the safe door with the Live Bolts in the locked (extended) position can damage the safe. The Locking Push Button should only be used when testing or programming the safe with the door remaining open. Home and Office Security Safes 3
-
 1
1 -
 2
2 -
 3
3 -
 4
4 -
 5
5 -
 6
6 -
 7
7 -
 8
8 -
 9
9 -
 10
10 -
 11
11 -
12
-
13
-
14
-
15
-
16
 |
 |
