Honeywell 5800PIR-RES Installation Instructions - Page 1
Honeywell 5800PIR-RES Manual
 |
View all Honeywell 5800PIR-RES manuals
Add to My Manuals
Save this manual to your list of manuals |
Page 1 highlights
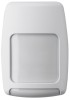
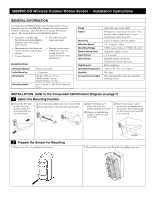
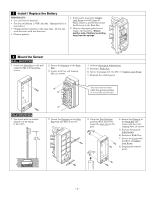
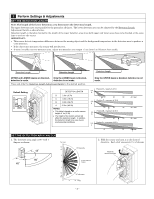
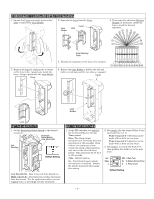
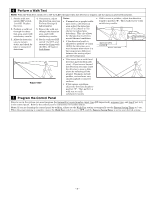
5800PIR-OD Wireless Outdoor Motion Sensor - Installation Instructions GENERAL INFORMATION The Honeywell 5800PIR-OD Wireless Outdoor Motion Sensor (referred to as the 5800PIR-OD) combines the convenience of wireless technology with a full featured outdoor PIR motion sensor. The major features are highlighted below: ƒ Immunity to bright light disturbances from headlights, sunlight, and other bright light sources. ƒ Discriminates both large and small animals to reduce false alarms. ƒ Tamper detection. ƒ Selectable detector range and angle. ƒ Battery saving circuit allows for a 5 or 120 second period of inactivity before being reactivated. SPECIFICATIONS Detection Method Initial Warm Up Dimensions Mounting Height Passive Infrared ~ 2 minutes Height 199mm (7.8 in.) Width 82mm (3.2 in.) Depth 120mm (4.7 in.) 0.8 - 1.2m (2.7 - 4ft) To the center of lens. Range Pattern Sensitivity Detection Speed Operating Voltage Battery Saving Timer Alarm Period LED Indicator Weatherproof Operating Temperature Humidity Accessories (included) Adjustable up to 12m (40ft) 90° pattern consisting of 13 zones. This pattern can be adjusted in 15° increments from center up to 45°. 2.0° C at 0.6m/s (3.6° F at 2.0ft/s) 0.3 - 1.5m/s (1 - 5ft/s) 6 VDC (uses 4 lithium 1.5VDC AA cells) Adjustable 120sec or 5sec ~ 2.5 seconds Enabled during a walk test. Disabled for normal operation. IP54 compliance - 20 to + 50 ° C (- 4 to +122° F) 95% Max Pole mounting kit, screw kit, detection masking strips. INSTALLATION (refer to the Component Identification Diagram on page 7) 1 Select the Mounting Position ‰ Orient the detector so that intrusion passes across the detection field, not into the sensor. ‰ Avoid strong sunlight into the sensor's field. ‰ Avoid moving or swaying trees and bushes. ‰ Allow 110mm (4.4") above the sensor to enable opening the cover. ‰ Choose an installation height of 0.8m to 1.2m (2.7 to 4ft). ‰ Ensure the sensor can be mounted on a perpendicular wall or pole that would make its detection pattern parallel to the ground. 2 Prepare the Sensor for Mounting 1. Remove the Cover by pulling from bottom. Parallel 2. Remove Detector from the Back Box by pulling from top.
-
 1
1 -
 2
2 -
 3
3 -
 4
4 -
 5
5 -
 6
6 -
 7
7 -
8
 |
 |