Honeywell CT3400 Owner's Manual - Page 3

Prepare For, Installation, Table Of Contents - thermostat troubleshooting

Page 3 highlights

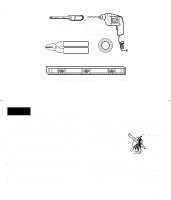
Table Of Contents STEP 1 Prepare For Installation ...2 STEP 2 Remove Old Thermostat 4 STEP 3 Before You Program ...6 Install the Batteries ...6 Adaptive Intelligent Recovery™ Selection 7 STEP 4 Program The Thermostat 9 STEP 5 Mount Thermostat Wallplate 16 STEP 6 Adjust System On-Time, Clock Display, as Required 18 STEP 7 Adjust Fan Operation Switch, as Required 20 STEP 8 Wire Wallplate Terminals 21 STEP 9 Mount The Thermostat 24 STEP 10 Check Thermostat Operation After Programming and Installing 25 STEP 11 Set the Fan and System Switches 28 Troubleshooting Guide ...30 Index ...34 Limited One-Year Warranty ...36 1 69-0733-3 STEP 1 Prepare For Installation s Check Table 1 to make sure this thermostat is compatible with your system. If not, return to retailer. For more information, call Honeywell Customer Assistance, toll-free 1-800-468-1502. Table 1. Compatibility Chart. System Type Compatible with CT3400/3455 Gas-Standing Pilot Gas-Electronic Ignition Gas-Fired Boilers Gas-Millivolt Oil-Fired Boilers Oil-Fired Furnace Electric Furnace Electric Air Conditioning Baseboard Electric (120/240 line volt) Heat Pumps/Multistage Equipment Yes Yes Yes 1 No Yes 1 Yes Yes Yes No No Not compatible with any 120/240 volt circuit. 1 Compatible with 2-wire Honeywell and Taco zone valves. Not compatible with 3-wire zone valves or 2-wire White Rodgers no. 1361 valves. 2 69-0733-3

  • 1
  • 2
  • 3
  • 4
  • 5
  • 6
  • 7
  • 8
  • 9
  • 10
  • 11
  • 12
  • 13
  • 14
  • 15
  • 16
  • 17
  • 18
  • 19
  • 20

STEP 1
Prepare For
Installation
Check Table 1 to make sure this thermostat is compatible with your system. If not, return to retailer.
For more information, call Honeywell Customer Assistance, toll-free 1-800-468-1502.
Table 1. Compatibility Chart.
System Type
Compatible with CT3400/3455
Gas—Standing Pilot
Yes
Gas—Electronic Ignition
Yes
Gas-Fired Boilers
Yes
Gas—Millivolt
No
Oil-Fired Boilers
Yes
Oil-Fired Furnace
Yes
Electric Furnace
Yes
Electric Air Conditioning
Yes
Baseboard Electric (120/240 line volt)
No
Heat Pumps/Multistage Equipment
No
Not compatible with any 120/240 volt circuit.
Compatible with 2-wire Honeywell and Taco zone valves. Not compatible with 3-wire zone valves
or 2-wire White Rodgers no. 1361 valves.
1
69-0733—3
Table Of Contents
STEP 1 Prepare For Installation
....................................................................................................
2
STEP 2 Remove Old Thermostat
..................................................................................................
4
STEP 3 Before You Program
.........................................................................................................
6
Install the Batteries
....................................................................................................................
6
Adaptive Intelligent Recovery™ Selection
.............................................................................
7
STEP 4 Program The Thermostat
.................................................................................................
9
STEP 5 Mount Thermostat Wallplate
..........................................................................................
16
STEP 6 Adjust System On-Time, Clock Display, as Required
................................................
18
STEP 7 Adjust Fan Operation Switch, as Required
..................................................................
20
STEP 8 Wire Wallplate Terminals
...............................................................................................
21
STEP 9 Mount The Thermostat
...................................................................................................
24
STEP 10 Check Thermostat Operation After Programming and Installing
...........................
25
STEP 11 Set the Fan and System Switches
..............................................................................
28
Troubleshooting Guide
................................................................................................................
30
Index
...............................................................................................................................................
34
Limited One-Year Warranty
.........................................................................................................
36
2
69-0733—3
1
1
1