Honeywell T812C1000 Installation Instructions - Page 4
Caution - thermostat
 |
View all Honeywell T812C1000 manuals
Add to My Manuals
Save this manual to your list of manuals |
Page 4 highlights
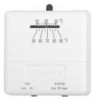
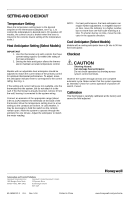
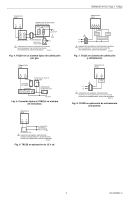
SETTING AND CHECKOUT Temperature Setting Move the temperature setting lever to the desired setpoint on the thermostat scaleplate, see Fig. 1, to control the temperature to desired point. (On positive off models, the control circuit is broken when the lever is moved to the extreme lowest setting of the temperature scale.) Heat Anticipator Setting (Select Models) IMPORTANT 1. Use this thermostat only with controls that have current rating equal to (or within) the rating of the heat anticipator. 2. Setting the heat anticipator allows the thermostat to maintain accurate temperature control. Models with an adjustable heat anticipator should be adjusted to match the current draw of the primary control for optimum thermostat performance. To adjust, move the anticipator indicator lever to correspond to the control rating. See Fig. 1. If the setting and current rating are not available, wire the thermostat into the system, but do not attach it to the wall. If the thermostat is already mounted, remove it from the wall, leaving it connected to the system wiring. Connect an ammeter of the appropriate range (about 0.0A to 2.0A) between the terminals on the back of the thermostat. Move the temperature setting lever to a low setting so the contacts are broken. In cold weather, it may be necessary to hold the switch so the controls remain open. Allow the system to operate through the ammeter for one minute. Adjust the anticipator to match the meter reading. NOTE: For best performance, the heat anticipator can require further adjustment. To lengthen burneron time, move the indicator to a higher number, but not more than one-half scale marking at a time. To shorten burner-on time, move the indicator in the opposite direction. Cool Anticipator (Select Models) Models with a cooling anticipator have a 24 Vac to 30 Vac fixed anticipator. Checkout CAUTION Shorting Hazard. Can damage heat anticipator. Do not check operation by shorting across system control terminals. Observe the system through at least one complete automatic cycle. Make certain that the system operates as intended. Check for correct operation of positive off switch, if used. Calibration This thermostat is carefully calibrated at the factory and cannot be field-adjusted. Automation and Control Solutions Honeywell International Inc. Honeywell Limited-Honeywell Limitée 1985 Douglas Drive North 35 Dynamic Drive Golden Valley, MN 55422 Scarborough, Ontario M1V 4Z9 69-1606ESF-3 G.H. Rev. 5-04 Printed in China www.honeywell.com/yourhome
-
 1
1 -
 2
2 -
 3
3 -
 4
4 -
 5
5 -
 6
6 -
 7
7 -
 8
8 -
 9
9 -
 10
10 -
11
-
12
 |
 |
