Hoover 72-59139 User Guide - Page 14
Lubrication
 |
View all Hoover 72-59139 manuals
Add to My Manuals
Save this manual to your list of manuals |
Page 14 highlights
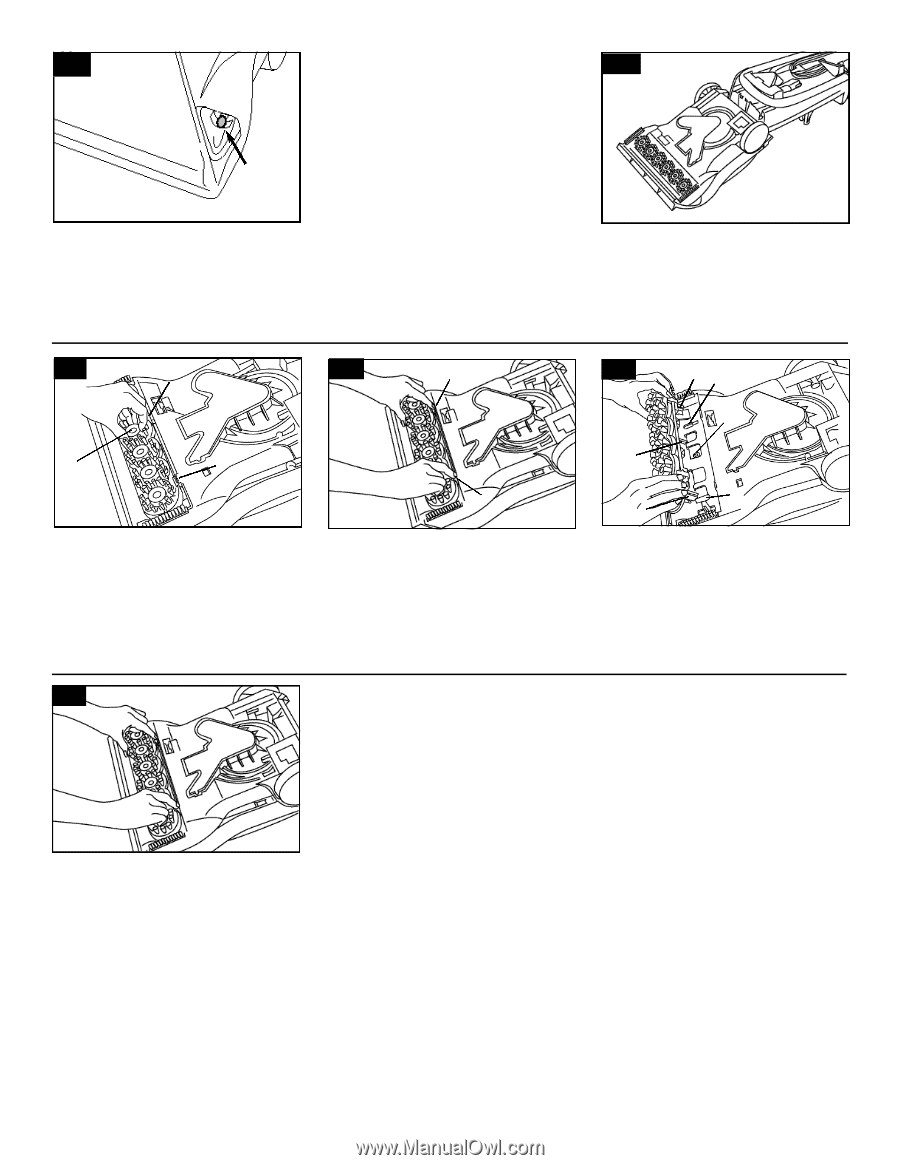
4-2 2. Pull old bulb straight out of socket. 3. Push new bulb straight into socket until locked into place. Excessive force is not required. Reposition lens and secure with screw. Removable brushes Your deep cleaner is equipped with removable brushes for easy cleaning. To remove brushes Disconnect cleaner from electrical outlet. To prevent possible leaking, remove clean solution tank and recovery tank. Set tanks aside. 4-3 Press handle release pedal to lower handle. Turn cleaner over so bottom is facing up. 4-4 B A B Grasp inner portion of brush (A) and pull brush assembly out slightly to reveal latches (B). 4-7 Press brush firmly to snap into place. 4-5 B B Press both latches (B) and pull brush block out. The brushes can be cleaned under running water. S t o r a g e Before storing: • Empty solution tank and rinse thoroughly with clean water. • Replace empty solution tank and turn deep cleaner ON. Squeeze trigger and push deep cleaner forward and back several times to expel any solution remaining in the deep cleaner's system. (Do not use deep cleaner on wood floors.) • Empty recovery tank and rinse thoroughly with clean water. Allow brushes and underside of deep cleaner to air dry thoroughly before storing deep cleaner on a carpeted or wood surface. Do not store deep cleaner with a full solution tank in place. 4-6 CD F E D C To replace brushes Align posts (C) on both ends of brush assembly with slots (D) in cleaner housing. Make sure that the square post (E) also aligns with the square hole (F). Turn brushes slightly until post fits easily into hole. Lubrication The motor is equipped with bearings which contain sufficient lubrication for the life of the motor. The addition of lubricant could cause damage. Do not add lubricant to motor bearings. 14
-
 1
1 -
2
-
3
-
4
-
5
-
6
-
7
-
8
-
 9
9 -
 10
10 -
 11
11 -
 12
12 -
 13
13 -
 14
14 -
 15
15 -
 16
16
 |
 |