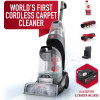
Hoover BH50700V Product Manual English - Page 4
Troubleshooting, Accessories
 |
View all Hoover BH50700V manuals
Add to My Manuals
Save this manual to your list of manuals |
Page 4 highlights
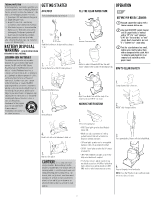
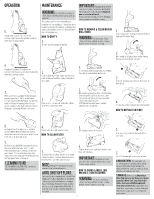
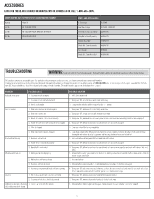
ACCESSORIES LOOK FOR THESE ACCESSORIES ON HOOVER.COM OR HOOVER.CA OR CALL 1-800-406-2005. EVERY ONEPWR BATTERY WORKS WITH EVERY ONEPWR PRODUCT. Battery: Model # 2.0 Ah BH15020; BH19020V 4.0 Ah BH15240; BH19240V; BH25040; BH29040V 8.0 Ah BH25280; BH29280V PARTS AND ACCESSORIES: 1.5A Charger BH05000 Dual Bay Charger BH05200; BH05200V Clean Water Tank Assembly 440016174 Dirty Water Tank Assembly 440016175 Handle Assembly 440016173 Brush Roll Cover Assembly 440016176 Fast Charger BH05140 Brush Roll Cover Hook Rail 440016180 TROUBLESHOOTING WARNING: To reduce the risk of injury from moving parts - Remove the battery before servicing. Do not use cleaner without brushes in place. This product contains no serviceable parts. For available replacement parts and accessories, see Hoover.com and search your model number. If appliance is not working as it should, has been dropped, damaged, left outdoors, or dropped into water, call customer service at 1.800.406.2005 prior to continuing use. Call support available Mon-Fri 9am6pm EST. Always identify your hard floor cleaner by the complete model number. (The model number appears on the bottom of the cleaner.) PROBLEM Reduced or no spray Loss of suction POSSIBLE CAUSE 1. Clean water tank is empty 2. Clean water tank not fully installed 3. Unit is in dry mode 1. Dirty water tank not installed properly 2. Dirty water tank is full 3. Brush roll cover is not installed properly 4. Brush roll cover hose behind brush roll is clogged 5. Filter is clogged 6. Dirty water tank screen is clogged Brush roll not turning Machine won't turn on 1. Handle is not reclined 2. Brush roll is not installed properly 3. Brush Roll is obstructed 1. Battery not installed properly 2. Battery does not have a charge 3. Handle is not fully installed 4. An obstruction prevented brush roll from spinning Leaking 1. Tab on clean water tank is not closed tightly 2. Clean water tank is not installed properly Light on the charger is flashing 1. There is an error with the battery red, and battery won't charge POSSIBLE SOLUTION 1. Refill clean water tank 2. Turn power OFF, reinstall clean water tank until snug 3. Change mode selection with the upper handle + / - buttons 1. Turn power OFF, remove and reinstall dirty water tank 2. Turn power OFF, empty and reinstall the dirty water tank 3. Turn power OFF, remove brush roll cover, reinstall brush roll and cover according to instructions on page 2 4. Turn power OFF, follow instructions for care of brush roll and cover on page 3 5. Clean and allow filter to dry completely 6. Clean float screen in the dirty water tank. Twist the screen counter-clockwise to remove from tank lid. Rinse thoroughly and replace by aligning grooves and twisting clockwise to secure to tank lid 1. Recline handle and turn power ON to allow brush roll to rotate 2. Turn power OFF, follow instructions for care of brush roll and cover on page 3 3. Turn power OFF, follow instructions for care of brush roll and cover on page Ensure brush roll is free of hair and debris 1. Remove battery, align guide rails to the front of the battery compartment and slide battery down until it clicks to ensure proper connection 2. Recharge battery 3. Remove battery, ensure handle is installed properly per assembly instructions on page 2 4. Turn power OFF and remove battery, follow instructions for care of brush roll and cover. Ensure brush roll is free of hair and debris and reinstall. If problem persists, see factory reset steps. 1. Turn power OFF, remove clean water tank, tighten tap and reinstall 2. Turn power OFF, remove clean water tank and reinstall until snug 1. Remove battery from charger and try again. If problem persists, call customer service for support 4
-
 1
1 -
 2
2 -
 3
3 -
 4
4 -
 5
5 -
 6
6 -
 7
7 -
 8
8 -
 9
9 -
 10
10 -
11
-
12
-
13
-
14
-
15
-
16
-
17
-
18
 |
 |
