Hoover FH40160 Product Manual - Page 11
Maintenance
 |
View all Hoover FH40160 manuals
Add to My Manuals
Save this manual to your list of manuals |
Page 11 highlights
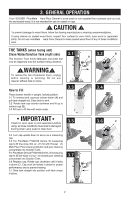
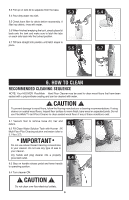
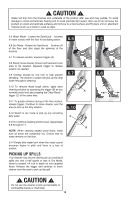
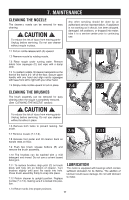
7. MAINTENANCE Cleaning the nozzle The cleaner's nozzle can be removed for easy cleaning. ! CAUTION ! To reduce the risk of injury from moving partsUnplug before servicing. Do not use cleaner without nozzle in place. 7.1 Pull on nozzle release latch (A) upward. 7.2 Remove nozzle by rotating nozzle. 7.3 Rinse nozzle under running water. Remove debris from squeegee (C) and wipe with a damp cloth. 7.4 To reattach nozzle, tilt cleaner backwards so the front of the foot is 2-3" off of the floor. Secure upper handle with one hand and align nozzle squeegee with base from left to right with your other hand. 7.5 Simply rotate nozzle upward to lock in place. Cleaning the brushes The brush assembly can be removed for easy cleaning when the nozzle is completely removed. (See "CLEANING THE NOZZLE" section) ! CAUTION ! To reduce the risk of injury from moving partsUnplug before servicing. Do not use cleaner without brushes in place. Any other servicing should be done by an authorized service representative. If appliance is not working as it should, has been dropped, damaged, left outdoors, or dropped into water, take it to a service center prior to continuing use. 7.1 7.2 A 7.4 7.5 7.6 Remove both tanks to prevent leaking. Set aside. 7.7 Remove nozzle (7.1-7.2). 7.8 Release foot pedal and tilt cleaner back so handle rests on floor. 7.9 7.11 DC 7.9 Push two brush release buttons (B) and remove the brush assembly. 7.10 The brushes can be washed with a mild detergent and rinsed. Do not use a solvent based detergent. 7.11 To replace brushes, align post (C) on brush block with hole (D) on bottom of cleaner. Turn brushes slightly until post fits easily into hole. Press brush assembly firmly to snap into place. 7.12 Return cleaner to upright position. Replace nozzle (7.4-7.5), making sure it is locked into position. B LUBRICATION The motor is equipped with bearings which contain sufficient lubrication for its lifetime. The addition of lubricant could cause damage. Do not add lubricant to motor. 7.13 Return tanks into proper positions. 11
-
 1
1 -
2
-
3
-
4
-
5
-
 6
6 -
 7
7 -
 8
8 -
 9
9 -
 10
10 -
 11
11 -
 12
12 -
 13
13 -
 14
14 -
 15
15 -
 16
16
 |
 |