Hoover FH40160 Product Manual - Page 8
Warning
 |
View all Hoover FH40160 manuals
Add to My Manuals
Save this manual to your list of manuals |
Page 8 highlights
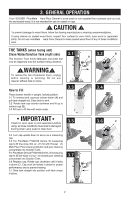
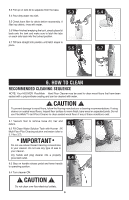
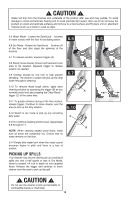
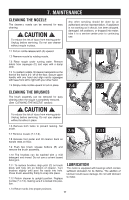
4. HOW TO USE Handle release pedal 4.1 Step on pedal (A) to lower handle to operating position. Handle does not lock into a single position, but "floats" to allow convenient operation. ON/OFF switch 4.2 Push switch (A) once to turn cleaner ON. Push A switch again to turn cleaner OFF. A Transporting 4.3 4.4 Cord Storage 4.5 B C To move your cleaner from room to room, put handle in upright position, tilt cleaner back on rear wheels and push forward. The cleaner may also be lifted using the carry handle (B) on front of cleaner. Wrap the cord clockwise around the two cord handle hooks (C). For convenient storage, attach the plug end to the cord. 5. How to empty Dirty Water Tank (left side when facing unit) When to Empty An automatic suction shut-off is built into the dirty water tank to prevent the tank from overflowing. When the shut-off activates, the cleaner will not pick up water or debris and the sound of the motor will change. The dirty water tank is full and must be emptied. How to Empty 5.1 To remove tank, press down on release button (A) and pull tank straight out. ! WARNING ! To reduce the risk of personal injury, unplug before cleaning or servicing. Do not use cleaner without tank in place. 5.1 5.2 A B C 5.2 Release tabs (B & C) on each side of the dirty water tank to unlock the top portion of the tank. 8
-
 1
1 -
2
-
 3
3 -
 4
4 -
 5
5 -
 6
6 -
 7
7 -
 8
8 -
 9
9 -
 10
10 -
 11
11 -
 12
12 -
 13
13 -
14
-
15
-
16
 |
 |