Hoover FH46000V Product Manual English - Page 2
Warning, Caution
 |
View all Hoover FH46000V manuals
Add to My Manuals
Save this manual to your list of manuals |
Page 2 highlights
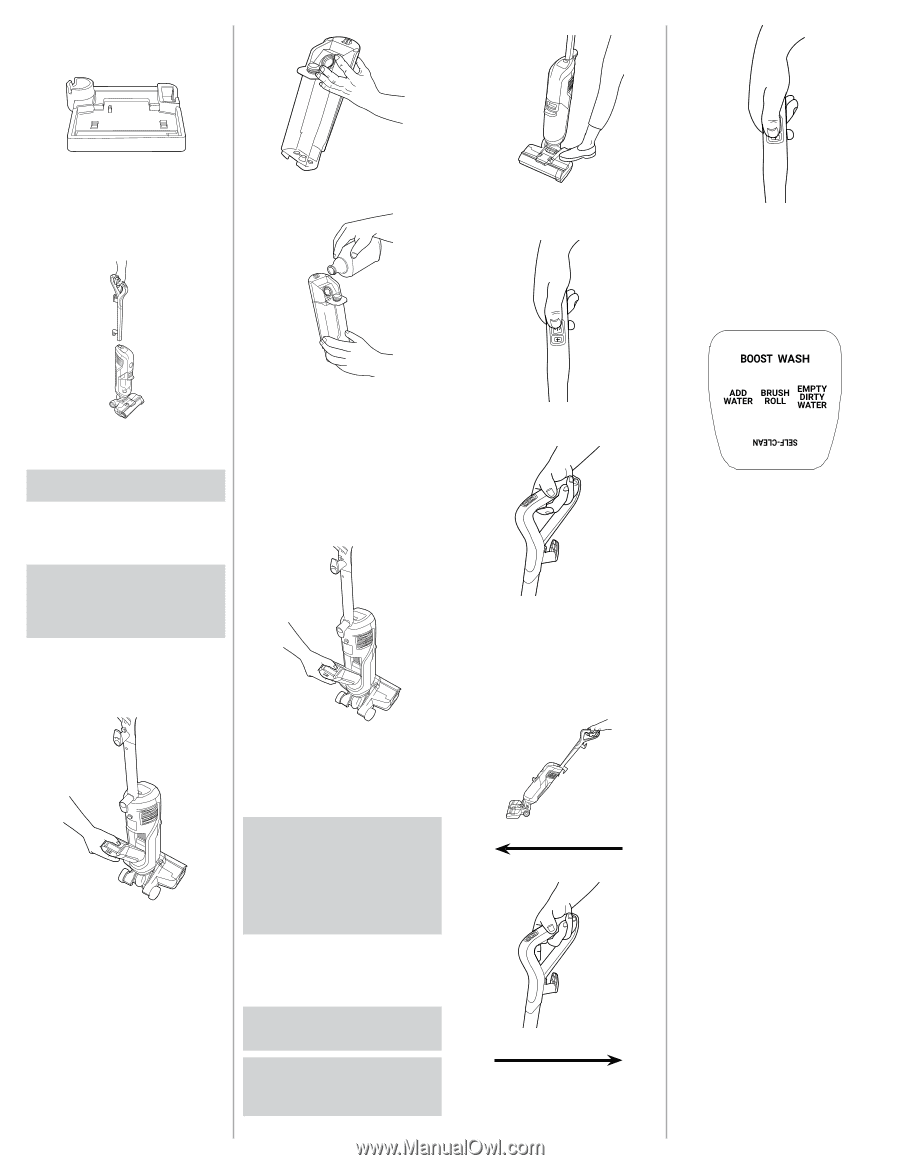
PRODUCT SET-UP 1 Place self-clean tray in storage area for placement of the unit after use. Ensure this is near an outlet to allow plug-in of the unit during self-clean process (Refer to Self-Cleaning Function section of manual.) 2 Pull back the tab to access fill hole. 1 Recline by placing a foot gently on the floor head of the unit and pull the handle backwards. 5 Press (+) to turn ON/OFF Boost mode. Use Boost mode when cleaning tough stains or when you need more power and water. **Boost mode only available on select models** SCREEN FUNCTIONS "Click" 2 Attach handle onto body of the unit, proper installation will result in a clicking sound. CORD STORAGE: Wrap the power cord around the cord hooks for convenient storage FILLING THE SOLUTION TANK 3 First fill with warm water to appropriate water line. Second, add solution to solution line. NOTE: Flap must be clicked in place for proper performance and to prevent leaking. NOTE: Read the directions on the Hoover Hard Floor solution prior to use. CLEANING FLUID: SEE THE HOOVER SOLUTION GUIDE insert or visit Hoover.com/cleaningsolutions. 2 Press the power button (power symbol) to turn the unit on. WARNING: To reduce the risk of personal injury, unplug before cleaning or servicing. Do not use cleaner without tank in place. IMPORTANT: Do not use solvent-based cleaning concentrates in your cleaner. Do not use any type of wax in your cleaner. Dry hands and plug cleaner into a properly grounded outlet. 3 Engage the trigger on the handle to dispense solution while using the unit. 4 Move unit forwards and backwards across hard floors. 4 Close tab and put clean water tank back into the unit. OPERATION 1 Remove the clean water tank from the back of the unit by pressing down the button and pulling out. CAUTION: To prevent damage to wood floors, follow the flooring manufacturer's cleaning recommendations. If using cleaner on sealed wood floors, inspect floor surface for worn finish, bare wood or separated joints. Do not use to clean sealed wood floors if any of these conditions exist. IMPORTANT: check for worn spots or joint separations before using, as these conditions could lead to damaged flooring when using water to clean floor. CAUTION: Do not clean over floor electrical outlets. CAUTION: Do not use the cleaner to pick up flammable or combustible liquids or chemicals. TRIGGER ENGAGED TRIGGER DISENGAGED 1. 2. 3. 4. 5. 6. 1. BOOST icon lights up when Boost Mode is turned ON. 2. WASH icon lights up when trigger is engaged and Streamline™ is dispensing fluid. 3. ADD WATER icon lights up when the clean water tank needs to be refilled. 4. BRUSH ROLL MAINTENANCE icon lights up to indicate a brush roll jam. 5. EMPTY DIRTY WATER icon lights up when the dirty water tank needs to be emptied. 6. SELF-CLEAN lights up when the unit is in the storage tray. Press the button to initiate the self-clean cycle.
-
 1
1 -
 2
2 -
 3
3 -
 4
4 -
 5
5 -
 6
6 -
 7
7 -
 8
8 -
9
-
10
-
11
-
12
-
13
-
14
-
15
 |
 |