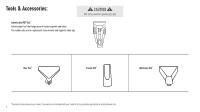
Hoover SmartWash PET Complete Automatic Bundle Product Manual English - Page 10
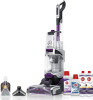
Getting Started With Your SmartWash Carpet Cleaner
 |
View all Hoover SmartWash PET Complete Automatic Bundle manuals
Add to My Manuals
Save this manual to your list of manuals |
Page 10 highlights
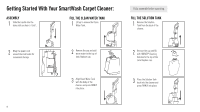
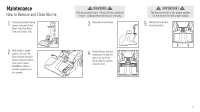
Getting Started With Your SmartWash Carpet Cleaner: ASSEMBLY 1 Slide the handle into the base until you hear a "click". FILL THE CLEAN WATER TANK 1 Lift up to remove the Clean Water Tank. Fully assemble before operating. FILL THE SOLUTION TANK 1 Remove the Solution Tank from the back of the cleaner. 2 Wrap the power cord around the cord hooks for convenient storage. 10 2 Remove the cap and add warm water to the top of tank. Replace cap. 3 Align Clean Water Tank with the body of the cleaner and press FIRMLY into place. 2 Remove the cap and fill with HOOVER® Cleaning Solution to the top of the tank. Replace cap. 3 Place the Solution Tank back into the cleaner and press FIRMLY into place.
-
 1
1 -
2
-
3
-
4
-
 5
5 -
 6
6 -
 7
7 -
 8
8 -
 9
9 -
 10
10 -
 11
11 -
 12
12 -
 13
13 -
 14
14 -
 15
15 -
16
-
17
-
18
-
19
-
20
-
21
-
22
-
23
-
24
-
25
-
26
-
27
-
28
-
29
-
30
-
31
-
32
-
33
-
34
-
35
-
36
-
37
-
38
-
39
-
40
-
41
-
42
-
43
-
44
-
45
-
46
-
47
-
48
-
49
-
50
-
51
-
52
-
53
-
54
-
55
-
56
-
57
-
58
-
59
-
60
-
61
-
62
-
63
-
64
-
65
-
66
-
67
-
68
-
69
-
70
-
71
-
72
 |
 |

10
Getting Started With Your SmartWash Carpet Cleaner:
Slide the handle into the
base until you hear a “click”.
1
ASSEMBLY
Wrap the power cord
around the cord hooks for
convenient storage.
2
FILL THE CLEAN WATER TANK
FILL THE SOLUTION TANK
Lift up to remove the Clean
Water Tank.
Remove the Solution
Tank from the back of the
cleaner.
Align Clean Water Tank
with the body of the
cleaner and press FIRMLY
into place.
Place the Solution Tank
back into the cleaner and
press FIRMLY into place.
1
1
3
3
2
2
Remove the cap and add
warm water to the top of
tank. Replace cap.
Remove the cap and fill
with HOOVER® Cleaning
Solution to the top of the
tank. Replace cap.
Fully assemble before operating.