Hoover SmartWash PET Complete Automatic Bundle Product Manual English - Page 16
How to Change and Clean Brushes
 |
View all Hoover SmartWash PET Complete Automatic Bundle manuals
Add to My Manuals
Save this manual to your list of manuals |
Page 16 highlights
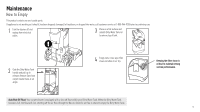
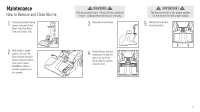
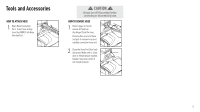
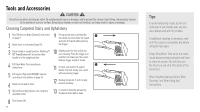
Maintenance How to Change and Clean Brushes HOW TO REMOVE 1 To prevent possible leaking, remove Clean Water Tank, Dirty Water Tank and Solution Tank. ! WARNING ! Risk of personal injury - Brush roll may suddenly restart - unplug before cleaning or servicing. 3 Grab Side A and pull up to remove. Repeat on the A other brush. HOW TO REPLACE 1 At an angle, align side B on the brush to the drive gear. 2 With handle in upright position, follow "Nozzle: How to Remove and Clean" instructions (page 15). STORAGE Before storing: Empty Clean Water Tank and let air dry. Replace on cleaner. Empty Dirty Water Tank, clean filter of dirt/debris, rinse tank and lid thoroughly with clean water and let air dry. Empty Solution Tank, rinse tank with clean water and let air dry. Allow brushes and underside of carpet cleaner to air dry thoroughly before storing carpet cleaner on a carpeted or wood surface. 16 4 The brushes can be cleaned under running water. CORD STORAGE Wrap the power cord around the cord hooks for convenient storage. Attach the plug end to the cord. B 2 Press Tab A down until brush snaps in place. A LUBRICATION The motor and brush rolls are equipped with bearings which contain sufficient lubrication for their lifetime. The addition of lubricant could cause damage. Do not add lubricant to motor bearings or brush rolls.
-
 1
1 -
2
-
3
-
4
-
5
-
6
-
7
-
8
-
9
-
10
-
 11
11 -
 12
12 -
 13
13 -
 14
14 -
 15
15 -
 16
16 -
 17
17 -
 18
18 -
 19
19 -
 20
20 -
 21
21 -
22
-
23
-
24
-
25
-
26
-
27
-
28
-
29
-
30
-
31
-
32
-
33
-
34
-
35
-
36
-
37
-
38
-
39
-
40
-
41
-
42
-
43
-
44
-
45
-
46
-
47
-
48
-
49
-
50
-
51
-
52
-
53
-
54
-
55
-
56
-
57
-
58
-
59
-
60
-
61
-
62
-
63
-
64
-
65
-
66
-
67
-
68
-
69
-
70
-
71
-
72
 |
 |
