Hoover UH70040W Product Manual - Page 4
Position tools
 |
View all Hoover UH70040W manuals
Add to My Manuals
Save this manual to your list of manuals |
Page 4 highlights
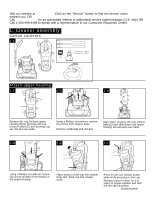
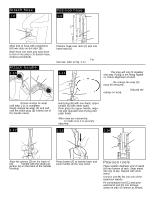
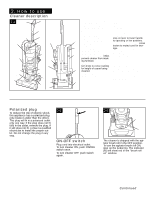
Attach hose 1-8 Position hose 1-9 C A B B Align end of hose with projections (A) over slots on dirt duct (B). Slide hose into slots and twist hose to lock it into place (To detach hose, reverse procedure). Attach handle 1-10 A A B D Position hose over rack (C) and into hose tube (D). NOTE: Hose must be connected at the hose tube (D) and at the dirt duct (B) on the back of the cleaner for carpet or floor cleaning. For tool use, refer to Fig. 2-11. 1-11 B C PUSH FIRMLY UNTIL YOU HEAR A SNAP OR CLICK! Note: The plug will only fit together one way. If plug is not fitting together, check alignment of ends. After the plug ends are fully connected, the orange tie wrap (A) must be removed. Use caution so as NOT TO CUT the black power cord. Discard the orange tie wrap. DO NOT remove orange tie wrap until step 1-11 is complete. Grasp orange tie wrap (A) and pull until the black plug (B) comes out of the handle cavity. Hold plug (B) with one hand; upper handle (C) with other hand. Push plug into upper handle, aligning with opposite end of plug and push firmly UNTIL YOU HEAR A SNAP OR A CLICK. After ends are connected, pull on plug to make sure it is securely attached. 1-12 D 1-13 F 1-14 B D A C E Align the groove (D) on the back of the upper handle with the small projection (E) on the back of the handle housing. Press button (F) at handle base and push handle all the way down. 4 Position tools Place smaller diameter end of wand (A) into bottom of rack. Snap wand into clip at top. Repeat with other wand. Crevice tool (B) fits into one of the extension wands. Fit combination tool (C) and powered hand tool (D) into storage areas on side of cleaner as shown.
-
 1
1 -
 2
2 -
 3
3 -
 4
4 -
 5
5 -
 6
6 -
 7
7 -
 8
8 -
 9
9 -
 10
10 -
11
-
12
-
13
-
14
-
15
 |
 |
