Hoover WH10201 Product Manual - Page 5
Maintenance: replacing the filter, How To Use: control panel
 |
View all Hoover WH10201 manuals
Add to My Manuals
Save this manual to your list of manuals |
Page 5 highlights
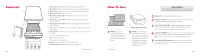
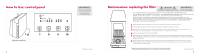
How To Use: control panel VERTICAL POSITION 5 •IMPORTANT • This unit is equipped with a smart panel that senses your touch. Heavy pushing is not recommended. *Varies per model Maintenance: replacing the filter ! CAUTION ! •IMPORTANT• To reduce the risk of injury from NOTE: THE FILTERS moving parts - unplug before servicing. ARE NOT WASHABLE. ANY OTHER SERVICING SHOULD BE DONE BY AN AUTHORIZED SERVICE REPRESENTATIVE. IF APPLIANCE IS NOT WORKING AS IT SHOULD, HAS BEEN DROPPED, DAMAGED, LEFT OUTDOORS, OR DROPPED INTO WATER, TAKE IT TO A SERVICE CENTER PRIOR TO CONTINUING USE. UNDER NORMAL OPERATING CONDITIONS THE MAIN FILTER SHOULD BE CHANGED EVERY SIX MONTHS. REPLACE ODOR FILTER* EVERY THREE MONTHS. THE FILTERS MAY NEED TO BE CHANGED MORE OFTEN IN HEAVY USE SUCH AS SMOKY OR DUSTY ENVIRONMENTS. HAVE SPARE FILTERS AVAILABLE FOR LATER REPLACEMENT. 1 When the filter light is illuminated, turn the unit off and unplug it from the power outlet. 2 Press buttons on sides of unit to release front cover. Rotate top down and remove. 3 Remove the used filter. Note: the odor filter is attached with hook and loop closure to the main filter. The odor filter* is an optional feature. The unit will continue to clean the air without it. 2 4 Remove the packaging from the new filter(s). 5 The odor filter is reversible and attaches to the hook and loop closure applied to the front of the main filter. Place the filter(s) in the unit according to the air flow direction arrow as indicated on the main filter. Place new filter(s) into the unit. 3 6 Replace the door by aligning and inserting the two door tabs, located at the bottom of the door, into the holes provided on the unit frame. Rotate the top of the door toward the top of the unit and insure the door snaps into place on both sides. Please see the filter installed in your machine for reorder information. *Varies per model 6
-
 1
1 -
 2
2 -
 3
3 -
 4
4 -
 5
5 -
 6
6 -
 7
7 -
 8
8 -
 9
9 -
 10
10 -
 11
11 -
12
-
13
 |
 |
