Hotpoint NVLR223GGWW Installation Instructions - Page 5
Exhaust, Connection, Leveling
 |
View all Hotpoint NVLR223GGWW manuals
Add to My Manuals
Save this manual to your list of manuals |
Page 5 highlights
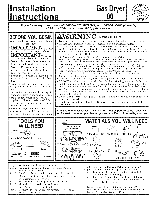
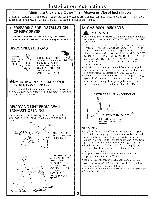
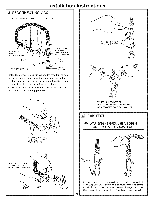
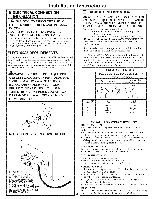
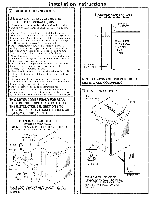
Installation instructions [_ EXHAUST CONNECTION _ WARNING - TO REDUCE THE RISK OF FIRE OR PERSONAL INJURY: * This clothes dIyer must be exhausted to the outdoors. , Use only 4" rigid metal ducting for the home exhaust duct. e Use only 4" rigid metal or Ui,-listed flexible metal (semi-rigid or foil-type) duct to connect the d_yer to the home exhaust duct. It must be installed in accordance with the instructions found in "Connecting The D_Ter To House Vent" on page 6 of this manual. * Do not terminate exhaust in a chimney, a wall, a ceiling, gas vent, crawl space, attic, under an enclosed floor, or in any other concealed space of a building. The accumulated lint could create a fire hazard. * Never terminate the exhaust into a common duct with a kitchen exhaust system. A combination of grease and lint creates a potential fire hazard. * Do not use duct longer than specified in the exhaust length ruble. Longer ducts can accumulate lint, creating a potential fire hazard. * Never install a screen in or over the exhaust duct. This will cause lint to accumulate, creating a potential fire hazard. * Do not assemble ducta, vork with any fasteners that extend into the duct. These fasteners can accumulate lint, creating a potential fire hazard. * Do not obstruct incoming or exhausted air. * Provide an access for inspection and cleaning of the exhaust system, especially at turns and joints. Exhaust system shall be inspected and cleaned at least once a year. THiS DRYER COMES READY FOR REAR EXHAUSTING. iF SPACE iS LiMiTED, USE THE iNSTRUCTiONS iN SECTION 9 TO EXHAUST DIRECTLY FROM THE SIDES OR BOTTOM OF THE CABINET. STANDARD REAR EXHAUST {Vented above floor level) ELBOWHIGHLY RECOMMENDED ELBOWHIGHLY RECOMMENDE- D RECOMMENDED CONFIGURATION TOMINIMIZE EXHAUST BLOCKAGE. NOTE: ELBOWS WiLL PREVENT DUCT KiNKiNG AND COLLAPSING. FS-L] EVELING DRYER LEVEL FRON_TO-BACK. -_ LEVEL SIDE-TO-SIDE. STANDARD REAR EXHAUST {Vented at floor level) FORSTRAIGHLTINEINSTALLATIOCNO, NNECTTHEDRYEREXHAUSTTO THEEXTERNAELXHAUSHTOODUSINGDUCTTAPEORCLAMP. CSA(AGAA) PPROVED NEWFLEXIBLGEAS LINECONNECTOR GAS EXTERNALINLET DUCT OPENING DUCTTAPEOR DUCTCLAMP 4" METALDUCT (CUTTOPROPER LENGTH) DUCTTAPEOR DUCTCLAMP NOTEW: ESTRONGLRYECOMMENSDOLIDMETALEXHAUSDTUCTING. HOWEVERIF,FLEXIBLDEUCTINGISUSEDITMUSTBEUL-LISTEMDETAL NOTPLASTIC. 4 LEVELINLGEGS STANDTHEDRYEURPRIGHNTEARTHE 2ANTI-TIPLEGS FINALLOCATIOANNDADJUSTTHE4LEVELING LEGSTOMATCHTHEHEIGHOT FYOURWASHER. ADJUST HE2 ANTI-TIPLEGSTOCONTACT THEFLOOR. 5
-
 1
1 -
 2
2 -
 3
3 -
 4
4 -
 5
5 -
 6
6 -
 7
7 -
 8
8
 |
 |
