Hotpoint NVLR223GGWW Installation Instructions - Page 8
Adding, Elbow, For Exhaust, Through, Bottom, Of Cabinet, Cover, Plate, Changing, Direction, Opening - dryer parts
 |
View all Hotpoint NVLR223GGWW manuals
Add to My Manuals
Save this manual to your list of manuals |
Page 8 highlights
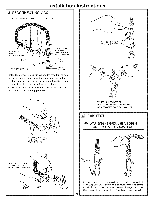
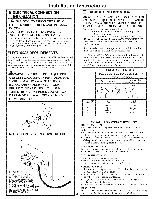
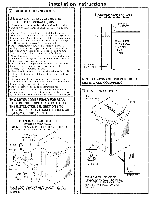
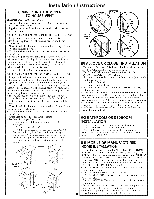
Installation Instructions ADDING ELBOW FOR EXHAUST THROUGH BOTTOM OF CABINET . Insert die elbow dn'ough the rear opening it to tile dlyer internal duct. . Apply duct tape oil the joint between tile duct and elbow, as shown on page 7. and dryer connect internal [_ CHANGING DIRECTION OF DOOR OPENING REMOV4E HINGESCREWS. REMOV4EHOLEPLUGSAND PLACETHEMINTHEHOLES ONTHEOPPOSITSEIDE. CAUTION: Internal duct joints must be secured with tape, otherwise they may separate and cause a safety hazard. ADDING COVER PLATE TO REAR OF CABINET ROTATDEOOR1800 ANDREINSTALL. PLATE (KIT WE1M454) Comlect standard metal elbows and ducts to complete rile exhaust system. Cover back opening with a plate (Kit WE1M454) available Kom your local service provider. Place dryer in final iocauon. ,_ WARNING- NEVER LEAVE THE BACK OPENING WITHOUT THE PLATE. [_ SERVICING For Quesdons on Installadon, Call: 1-800-626-2000 (US) or 500A436P006 1-800-561-3344 (Canada). Pub. # 31-16225 8 _k WARNING- LABEL ALL WIRES PRIOR TO DISCONNECTION WHEN SERVICING CONTROLS. WIRING ERRORS CAN CAUSE IMPROPER AND DANGEROUS OPERATION AFTER SERVICING/INST ALLATION. For replacement parts and other infornmtion, refer to Owner's Mammi for servicing phone mmfl)ers.
-
 1
1 -
2
-
 3
3 -
 4
4 -
 5
5 -
 6
6 -
 7
7 -
 8
8
 |
 |
