Hotpoint NWXR483GGWW Installation Instructions - Page 5
Exhaust Connection, Leveling Dryer
 |
View all Hotpoint NWXR483GGWW manuals
Add to My Manuals
Save this manual to your list of manuals |
Page 5 highlights
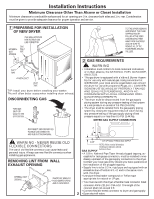
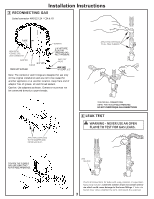
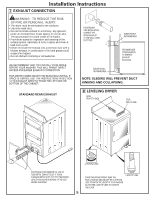
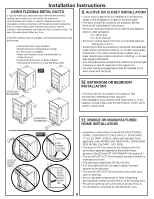
Installation Instructions 7 EXHAUST CONNECTION WARNING - TO REDUCE THE RISK OF FIRE OR PERSONAL INJURY: • This dryer must be exhausted to the outdoors. • Use only metal duct. • Do not terminate exhaust in a chimney, any gas vent, under an enclosed floor (crawl space), or into an attic. The accumulated lint could create a fire hazard. • Provide an access for inspection and cleaning of the exhaust system, especially at turns. Inspect and clean at least once a year. • Never terminate the exhaust into a common duct with a kitchen exhaust. A combination of lint and grease could create a fire hazard. • Do not obstruct incoming or exhausted air. WE RECOMMEND THAT YOU INSTALL YOUR DRYER BEFORE YOUR WASHER. THIS WILL PERMIT DIRECT ACCESS FOR EASIER EXHAUST CONNECTION THIS DRYER COMES READY FOR REAR EXHAUSTING. IF SPACE IS LIMITED, USE THE INSTRUCTIONS IN SECTION 12 TO EXHAUST DIRECTLY FROM THE LEFT SIDE OR BOTTOM OF THE CABINET. STANDARD REAR EXHAUST FOR STRAIGHT LINE INSTALLATION, CONNECT THE DRYER EXHAUST TO THE WALL USING DUCT TAPE. ELBOW HIGHLY RECOMMENDED. RECOMMENDED CONFIGURATION TO MINIMIZE EXHAUST BLOCKAGE. ELBOW HIGHLY RECOMMENDED. NOTE: ELBOWS WILL PREVENT DUCT KINKING AND COLLAPSING. 8 LEVELING DRYER LEVEL FRONT-TO-BACK. LEVEL SIDE-TO-SIDE. WE STRONGLY RECOMMEND THE USE OF RIGID METAL EXHAUST DUCT. IF USING FLEXABLE METAL DUCT, CUT IT TO THE PROPER LENGTH AND AVOID BUNCHING OF THE DUCT BEHIND THE DRYER. 4 LEVELING LEGS STAND THE DRYER UPRIGHT NEAR THE FINAL LOCATION AND ADJUST THE 4 LEVELING LEGS TO MATCH THE HEIGHT OF YOUR WASHER. ADJUST THE 2 ANTI-TIP LEGS TO CONTACT THE FLOOR. 2 ANTI-TIP LEGS 5
-
 1
1 -
 2
2 -
 3
3 -
 4
4 -
 5
5 -
 6
6 -
 7
7 -
 8
8
 |
 |
