Hotpoint RB757WHWW Use and Care Manual / Warranty - Page 10
Oven Control, Clock and Timer Features and Settings - model
 |
View all Hotpoint RB757WHWW manuals
Add to My Manuals
Save this manual to your list of manuals |
Page 10 highlights
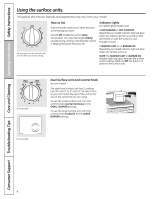
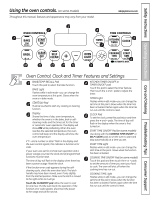
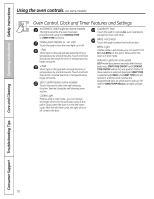
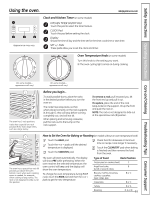
Consumer Support Troubleshooting Tips Care and Cleaning Operating Instructions Safety Instructions Using the oven controls. (on some models) Oven Control, Clock and Timer Features and Settings AuTOMATIC OVEN light (on some models) This lights anytime the oven has been programmed using the COOKING TIME or START TIME functions. OVEN lIGhT ON/OFF or Pad Touch this pad to turn the oven light on or off. - Pad Short taps to this pad will decrease the time or temperature by small amounts. Touch and hold the pad to decrease the time or temperature by larger amounts. + Pad Short taps to this pad will increase the time or temperature by small amounts. Touch and hold the pad to increase the time or temperature by larger amounts. SElF ClEAN Pad (on some models) Touch this pad to select the self-cleaning function. See the using the self-cleaning oven section. ClEAN light Flashes while in edit mode-you can change the length of time for the self-clean cycle at this point. Glows when the oven is in the self-clean cycle. After the self-clean cycle, the light will turn off. Unlatch the door. ClEAR/OFF Pad Touch this pad to cancel ALL oven operations except the clock and timer. BROIl hI/lO Pad Touch this pad to select the broil function. BROIl light Flashes while in edit mode-you can switch from HI to LO BROIL at this point. Glows when the oven is in broil mode. Indicator lights (on some pads) EDIT mode lasts several seconds after the last pad press. START TIME ON/OFF and COOKING TIME ON/OFF will be the only pads lit if either of these options is selected. (Example: START TIME is selected with BAKE-the START TIME pad will remain lit until the clock reaches the programmed time, at which point it will turn off and the BAKE/TEMP RECALL pad light will light up). 10
-
 1
1 -
2
-
3
-
4
-
 5
5 -
 6
6 -
 7
7 -
 8
8 -
 9
9 -
 10
10 -
 11
11 -
 12
12 -
 13
13 -
 14
14 -
 15
15 -
16
-
17
-
18
-
19
-
20
-
21
-
22
-
23
-
24
-
25
-
26
-
27
-
28
-
29
-
30
-
31
-
32
-
33
-
34
-
35
-
36
-
37
-
38
-
39
-
40
 |
 |