Hotpoint RB757WHWW Use and Care Manual / Warranty - Page 27
Safety Instructions, Operating Instructions, Troubleshooting Tips, Consumer Support
 |
View all Hotpoint RB757WHWW manuals
Add to My Manuals
Save this manual to your list of manuals |
Page 27 highlights
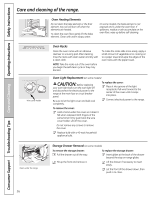
Safety Instructions Operating Instructions Care and Cleaning Troubleshooting Tips Consumer Support Pull the knob straight off the stem. GEAppliances.com Control Panel and Knobs It's a good idea to wipe the control panel after each use of the oven. Use a damp cloth to clean or rinse. For cleaning, use mild soap and water or a 50/50 solution of vinegar and water. For rinsing, use clean water. Polish dry with a soft cloth. Do not use abrasive cleansers, strong liquid cleaners, plastic scouring pads or oven cleaners on the control panel-they will damage the finish. The control knobs may be removed for easier cleaning. Make sure the knobs are in the OFF positions and pull them straight off the stems for cleaning. The knobs can be cleaned in a dishwasher or they may also be washed with soap and water. Make sure the insides of the knobs are dry before replacing. Replace the knobs in the OFF position to ensure proper placement. Warming Drawer Rack (on some models) Clean the rack with detergent and water. After cleaning, rinse the rack with clean water and dry with a clean cloth. Removable Warming Drawer (on some models) NOTE: For models with an electric warming drawer, before performing any adjustments, cleaning or service, disconnect the range electrical power supply at the household distribution panel by removing the fuse or switching off the circuit breaker. Make sure the warming drawer heating element is cool. To replace the warming drawer: Place the left drawer rail around the inner left rail guide and slide it in slightly to hook it. Place the right drawer rail around the inner right rail guide and slide it in slightly to hook it. Slide the drawer all the way in. Most cleaning can be done with the drawer in place. However, the drawer may be removed if further cleaning is needed. Use soap and warm water to thoroughly clean. To remove the warming drawer: Pull the drawer straight out until it stops. Press the left rail release up and press the right rail release down, while pulling the drawer forward and free. Oven Vent On glass cooktop models, the oven is vented through an opening at the rear of the cooktop. On coil cooktop models, the oven is vented through an opening under the right rear surface unit. Never cover the opening with aluminum foil or any other material. 27
-
 1
1 -
2
-
3
-
4
-
5
-
6
-
7
-
8
-
9
-
10
-
11
-
12
-
13
-
14
-
15
-
16
-
17
-
18
-
19
-
20
-
21
-
 22
22 -
 23
23 -
 24
24 -
 25
25 -
 26
26 -
 27
27 -
 28
28 -
 29
29 -
 30
30 -
 31
31 -
 32
32 -
33
-
34
-
35
-
36
-
37
-
38
-
39
-
40
 |
 |
