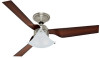
Hunter 20174 Owner's Manual - Page 9
Should you need to remove the canopy, trim ring, follow these steps
 |
View all Hunter 20174 manuals
Add to My Manuals
Save this manual to your list of manuals |
Page 9 highlights
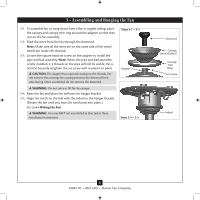
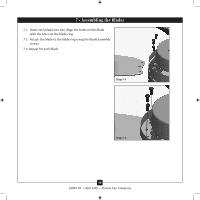
6 • Installing the Canopy and Canopy Trim Ring 6-1. Partially install two canopy screws (about 2 full turns) in the hanger bracket. 6-2. Raise the canopy over the hanger bracket. Align partially installed screws with key slots in canopy. 6-3. Twist canopy clockwise to secure. 6-4. Install third & fourth canopy screw in round hole on canopy. Securely tighten all four screws. 6-5. Using both hands, push the canopy trim ring up to the top of the canopy. 6-6. Twist canopy trim ring clockwise to secure the canopy. Steps 6-1 - 6-2 Canopy Should you need to remove the canopy trim ring, follow these steps: 1. Twist canopy trim ring counterclockwise until it releases from canopy. Hanger Bracket Canopy Trim Ring Step 6-4 Step 6-3 Step 6-5 Canopy Screw 9 45007-01 • 06/11/09 • Hunter Fan Company
-
 1
1 -
2
-
3
-
 4
4 -
 5
5 -
 6
6 -
 7
7 -
 8
8 -
 9
9 -
 10
10 -
 11
11 -
 12
12 -
 13
13 -
 14
14 -
15
 |
 |
