Hunter 25867 Owner's Manual - Page 13
large round hole in the bottom center of the switch
 |
View all Hunter 25867 manuals
Add to My Manuals
Save this manual to your list of manuals |
Page 13 highlights
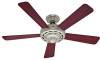
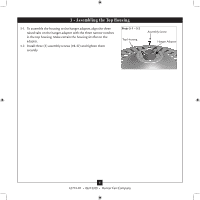
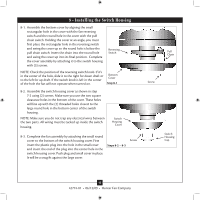
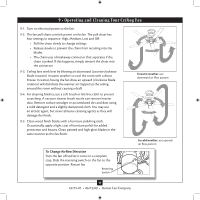
8 • Installing the Switch Housing 8-1. Assemble the bottom cover by aligning the small rectangular hole in the cover with the fan reversing switch and the round hole in the cover with the pull chain switch. Holding the cover at an angle, you must first place the rectangular hole in the reversing switch and swing the cover up so the round hole is below the pull chain switch. Insert the chain into the round hole and swing the cover up into its final position. Complete the cover assembly by attaching it to the switch housing with (3) screws. Reversing Switch NOTE: Check the position of the reversing switch knob. If it's in the center of the hole, slide it to the right for down draft or to the left for up draft. If the switch knob is left in the center of the hole the fan will not operate when turned on. Bottom Cover Step 8-1 8-2. Assemble the switch housing cover as shown in step 7-2 using (2) screws. Make sure you use the two square clearance holes in the bottom of the cover. These holes will line up with the (2) threaded holes closest to the large round hole in the bottom center of the switch housing. NOTE: Make sure you do not trap any electrical wires between the two parts. All wiring must be tucked up inside the switch housing. Switch Housing Cover 8-3. Complete the fan assembly by attaching the small round cover to the bottom of the switch housing cover. First Screw insert the plastic plug into the hole in the small cover Steps 8-2 - 8-3 and insert the end of the plug into the center hole in the switch housing cover. Push plug and small cover in place. It will be a snug fit against the large cover. Pull Chain Screw Switch Housing Cap 13 42774-01 • 06/12/09 • Hunter Fan Company
-
 1
1 -
2
-
3
-
4
-
5
-
6
-
7
-
 8
8 -
 9
9 -
 10
10 -
 11
11 -
 12
12 -
 13
13 -
 14
14 -
 15
15
 |
 |