Hunter 42999 Owner's Manual - Page 8
Installation - model
 |
View all Hunter 42999 manuals
Add to My Manuals
Save this manual to your list of manuals |
Page 8 highlights
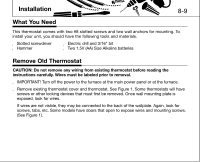
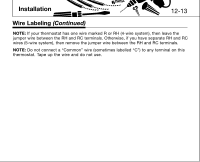
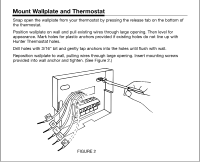
Installation 8-9 What You Need This thermostat comes with two #8 slotted screws and two wall anchors for mounting. To install your unit, you should have the following tools and materials. s Slotted screwdriver s Hammer s Electric drill and 3/16" bit s Two 1.5V (AA) Size Alkaline batteries Remove Old Thermostat CAUTION: Do not remove any wiring from existing thermostat before reading the instructions carefully. Wires must be labeled prior to removal. s IMPORTANT! Turn off the power to the furnace at the main power panel or at the furnace. s Remove existing thermostat cover and thermostat. See Figure 1. Some thermostats will have screws or other locking devices that must first be removed. Once wall mounting plate is exposed, look for wires. s If wires are not visible, they may be connected to the back of the wallplate. Again, look for screws, tabs, etc. Some models have doors that open to expose wires and mounting screws. (See Figure 1).
-
 1
1 -
2
-
 3
3 -
 4
4 -
 5
5 -
 6
6 -
 7
7 -
 8
8 -
 9
9 -
 10
10 -
 11
11 -
 12
12 -
 13
13 -
14
-
15
-
16
-
17
-
18
-
19
-
20
-
21
-
22
-
23
-
24
 |
 |
