Husqvarna 120i Operation Manual - Page 25
Tree felling technique
 |
View all Husqvarna 120i manuals
Add to My Manuals
Save this manual to your list of manuals |
Page 25 highlights
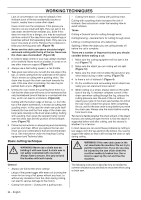
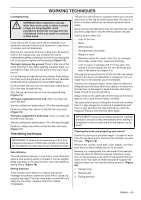
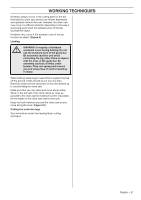
WORKING TECHNIQUES Cutting/bucking WARNING! Never attempt to cut logs ! while they are in a pile or when a couple of logs are lying together. Such procedures drastically increase the risk of kickback which can result in a serious or fatal injury. If you have a pile of logs, each log you attempt to cut should be removed from the pile, placed on a saw horse or runners and cut individually. Remove the cut pieces from the cutting area. By leaving them in the cutting area, you increase the risk for inadvertently getting a kickback, as well as increasing the risk of losing your balance while working. (Figure 74) The log is lying on the ground. There is little risk of the chain jamming or the object splitting. However there is a risk that the chain will touch the ground when you finish the cut. Cut all the way through the log from above. Avoid letting the chain touch the ground as you finish the cut. Maintain full throttle but be prepared for what might happen. If it is possible (can you turn the log?) stop cutting about 2/3 of the way through the log. Turn the log and finish the cut from the opposite side. (Figure 75) The log is supported at one end. There is a high risk that it will split. Start by cutting from below (about 1/3 of the way through). Finish by cutting from above so that the two cuts meet. (Figure 76) The log is supported at both ends. There is a high risk that the chain will jam. Start by cutting from above (about 1/3 of the way through). Finish by cutting from below so that the two cuts meet. (Figure 77) Tree felling technique IMPORTANT! It takes a lot of experience to fell a tree. Inexperienced users of chain saws should not fell trees. Do not attempt any task beyond your experience level! Safe distance The safe distance between a tree that is to be felled and anyone else working nearby is at least 2 1/2 tree lengths. Make sure that no-one else is in this "risk zone" before or during felling. (Figure 78) Felling direction Trees should not be felled in a manner that would endanger any person, strike any utility line or cause any property damage. If the tree does make contact with any utility line, the utility company should be notified immediately. The aim is to fell the tree in a position where you can limb and cross-cut the log as easily as possible. You want it to fall in a location where you can stand and move about safely. Once you have decided which way you want the tree to fall you must judge which way the tree would fall naturally. Several factors affect this: • Lean of the tree • Bend • Wind direction • Arrangement of branches • Weight of snow • Obstacles within the reach of the tree: for example, other trees, power lines, roads and buildings. • Look for signs of damage and rot in the stem, this makes it more probably that the tree will break and start to fall before you expect it to. You may find you are forced to let the tree fall in its natural direction because it is impossible or dangerous to try to make it fall in the direction you first intended. Another very important factor, which does not affect the felling direction but does affect your safety, is to make sure the tree has no damaged or dead branches that might break off and hit you during felling. Always keep on the uphill side of the terrain as the tree is likely to roll or slide downhill after it is felled. The main point to avoid is letting the tree fall onto another tree. It is very dangerous to remove a trapped tree and there is high accident risk. See instructions under the heading Freeing a tree that has fallen badly. IMPORTANT! During critical felling operations, hearing protectors should be lifted immediately when sawing is completed so that sounds and warning signals can be heard. Clearing the trunk and preparing your retreat Delimb the stem up to shoulder height. It is safer to work from the top down and to have the tree between you and the saw. (Figure 79) Remove dirt, stones, loose bark, nails, staples, and wire from the tree where felling cuts are to be made. Remove any undergrowth from the base of the tree and check the area for obstacles (stones, branches, holes, etc.) so that you have a clear path of retreat when the tree starts to fall. Your path of retreat should be roughly 135 degrees away from the intended felling direction. (Figure 80) 1 Danger zone 2 Retreat path 3 Felling direction English - 25
-
 1
1 -
2
-
3
-
4
-
5
-
6
-
7
-
8
-
9
-
10
-
11
-
12
-
13
-
14
-
15
-
16
-
17
-
18
-
19
-
 20
20 -
 21
21 -
 22
22 -
 23
23 -
 24
24 -
 25
25 -
 26
26 -
 27
27 -
 28
28 -
 29
29 -
 30
30 -
31
-
32
-
33
-
34
-
35
-
36
-
37
-
38
-
39
-
40
-
41
-
42
-
43
-
44
-
45
-
46
-
47
-
48
-
49
-
50
-
51
-
52
-
53
-
54
-
55
-
56
-
57
-
58
-
59
-
60
-
61
-
62
-
63
-
64
-
65
-
66
-
67
-
68
-
69
-
70
-
71
-
72
-
73
-
74
-
75
-
76
-
77
-
78
-
79
-
80
-
81
-
82
-
83
-
84
-
85
-
86
-
87
-
88
-
89
-
90
-
91
-
92
-
93
-
94
-
95
-
96
 |
 |
