Husqvarna 536LiL Owners Manual - Page 21
Maintenance
 |
View all Husqvarna 536LiL manuals
Add to My Manuals
Save this manual to your list of manuals |
Page 21 highlights
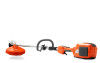
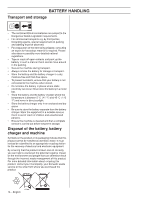
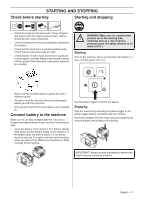
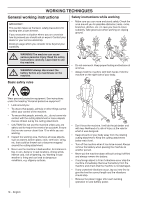
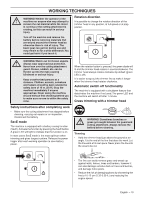
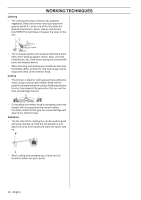
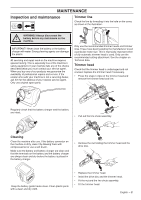
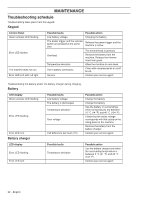
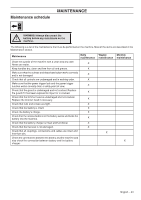
MAINTENANCE Inspection and maintenance Li-ion Trimmer line Check the line by threading it into the hole on the cover, as shown in the illustration. WARNING! Always disconnect the ! battery before any maintenace on the machine. IMPORTANT! Never clean the battery or the battery charger with water. Strong cleaning agents can damage the plastic. All servicing and repair work on the machine requires special training. This is especially true of the machine′s safety equipment. If your machine fails any of the checks described below you must contact your service agent. When you buy any of our products we guarantee the availability of professional repairs and service. If the retailer who sells your machine is not a servicing dealer, ask him for the address of your nearest service agent. Only use original spare parts. Only use the recommended trimmer heads and trimmer lines. These have been tested by the manufacturer to suit a particular motor size. This is especially important when a fully automatic trimmer head is used. Only use the recommended cutting attachment. See the chapter on Technical data. Trimmer head Check that the trimmer head is undamaged and not cracked. Replace the trimmer head if necessary. • Press the snap-in clips on the trimmer head and remove the trimmer head and line. Regularly check that the battery charger and the battery are intact. • Pull out the line chute assembly. Cleaning Clean the machine after use. If the battery connector on the machine is dirty, clean it by blowing them with compressed air or use a soft brush. Make sure the battery and battery charger are clean and that the terminals on the battery and the battery charger are always clean and dry before the battery is placed in the battery charger. • Remove the nut holding the trimmer head and the drive disc. Keep the battery guide tracks clean. Clean plastic parts with a clean and dry cloth. • Replace the trimmer head. • Install the drive disc and the trimmer head. • Fit the nut and the line chute assembly. • Fit the trimmer head. English - 21
-
 1
1 -
2
-
3
-
4
-
5
-
6
-
7
-
8
-
9
-
10
-
11
-
12
-
13
-
14
-
15
-
 16
16 -
 17
17 -
 18
18 -
 19
19 -
 20
20 -
 21
21 -
 22
22 -
 23
23 -
 24
24 -
 25
25 -
 26
26 -
27
-
28
-
29
-
30
-
31
-
32
-
33
-
34
-
35
-
36
-
37
-
38
-
39
-
40
-
41
-
42
-
43
-
44
-
45
-
46
-
47
-
48
-
49
-
50
-
51
-
52
-
53
-
54
-
55
-
56
-
57
-
58
-
59
-
60
-
61
-
62
-
63
-
64
-
65
-
66
-
67
-
68
-
69
-
70
-
71
-
72
-
73
-
74
-
75
-
76
 |
 |