Husqvarna AUTOMOWER 450X EPOS Owner Manual - Page 22
Operation, Main switch, To start the product, To select operation mode Start, Resume Schedule
 |
View all Husqvarna AUTOMOWER 450X EPOS manuals
Add to My Manuals
Save this manual to your list of manuals |
Page 22 highlights
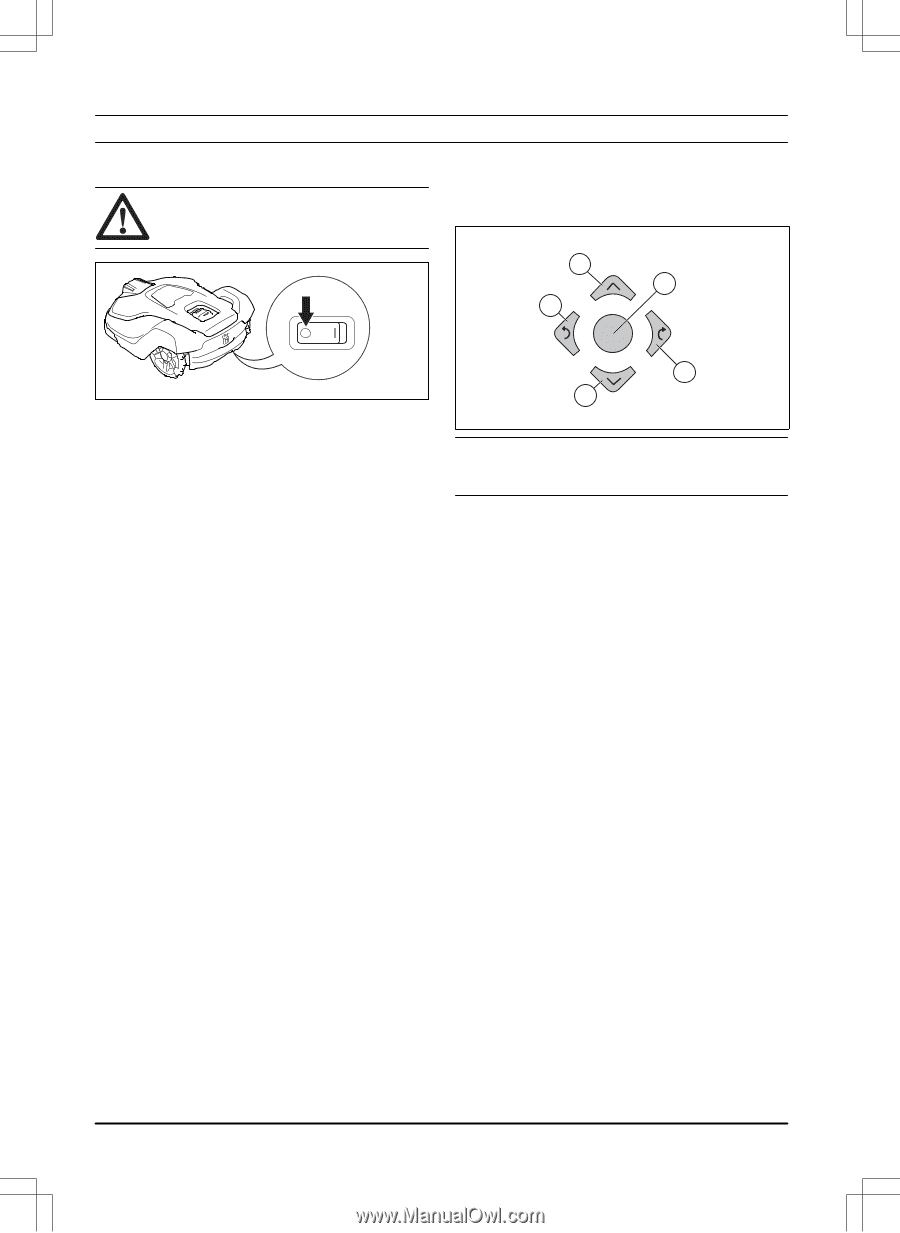
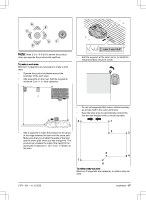
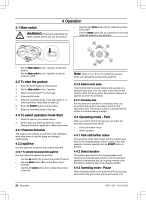
4 Operation 4.1 Main switch WARNING: Read and understand the safety chapter before you use the product. • Use the right arrow button (D) to rotate the product to the right. • Use the center button (E) as a joystick to move and rotate the product in any direction. A E C • Set the Main switch to the 1 position to start the product. • Set the Main switch to the 0 position to set the product to OFF. 4.2 To start the product 1. Push the STOP button on the product. 2. Set the Main switch to the 1 position. 3. Open the Automower® Connect app. 4. Enter the PIN code. 5. Select an operating mode in the app. Refer to To select operation mode Start on page 22. 6. Push the START button on the product. 7. Select an operating mode in the app. 4.3 To select operation mode Start 1. Open the app on your mobile device. 2. Select Start and select an operation mode: Resume Schedule, appDrive or Select work area. 4.3.1 Resume Schedule The product will continue to operate on the scheduled work area where it cuts the grass and charges automatically. 4.3.2 appDrive Use the appDrive to operate the product manually. 4.3.2.1 To operate the product with appDrive Use the buttons to operate the product: • Use the up button (A) to move the product forward. • Use the down button (B) to move the product rearward. • Use the left arrow button (C) to rotate the product to the left. D B Note: Walk 2-3 m / 6.5-9.8 ft. behind the product when you operate the product with appDrive. 4.3.3 Select work area This function lets the product temporarily operate in a selected work area. You can select a time limit for this function. After that time period, the product continues to operate as set in the schedule. 4.3.3.1 Secondary area For the product to operate in a secondary area, you must move the product manually to and from the secondary area. The product cuts for a selected period of time or until the battery is empty. 4.4 Operating mode - Park When you select Park in the app you can select the operation selections that follow: • Park until further notice • Select duration 4.4.1 Park until further notice The operation mode Park means that the product goes back to the charging station where it stays until a new operation mode is selected and the START button is pushed. 4.4.2 Select duration The product goes back to the charging station and stays for the selected park duration. Use the operation selection to temporary stop an ongoing mowing cycle and let the product to stay in the charging station. 4.4.3 Operating mode - Pause When selecting Pause in the Automower® Connect app, the product stop the current activity and pause. The 22 - Operation 1970 - 001 - 10.10.2022
-
 1
1 -
2
-
3
-
4
-
5
-
6
-
7
-
8
-
9
-
10
-
11
-
12
-
13
-
14
-
15
-
16
-
 17
17 -
 18
18 -
 19
19 -
 20
20 -
 21
21 -
 22
22 -
 23
23 -
 24
24 -
 25
25 -
 26
26 -
 27
27 -
28
-
29
-
30
-
31
-
32
-
33
-
34
-
35
-
36
-
37
-
38
-
39
-
40
-
41
-
42
-
43
-
44
 |
 |