Husqvarna AUTOMOWER 450XH EPOS Owner Manual - Page 15
To install the Automower® Connect app, Automower® Direct, To do the basic settings
 |
View all Husqvarna AUTOMOWER 450XH EPOS manuals
Add to My Manuals
Save this manual to your list of manuals |
Page 15 highlights
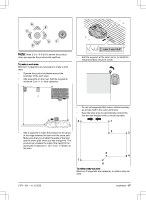
• My mowers can manage all the products paired to your account and add new ones. Note: All countries do not support cellular connection to Automower® Connect because of regional specified cellular systems. The included Automower® Connect lifetime service only applies if there is a third part subsupplier of 2G/4G available in the operational area. 3.8.5.1 To install the Automower® Connect app 1. Download the Automower® Connect app on your mobile device. 2. Sign up for a Husqvarna account in the Automower® Connect app. 3. An e-mail is sent to the registered e-mail address. Follow the instructions in the e-mail in less than 24 hours to validate your account. 4. Log in to your Husqvarna account in the Automower® Connect app. 3.8.5.2 Automower® Direct You can use Automower® Direct if you have the Automower® Connect app and the PIN code for the product but no Husqvarna account. Automower® Direct uses short-range Bluetooth® connectivity. It can be used if the cellular connectivity is not supported or for a temporary connection to the product. 3.8.6 To do the basic settings When the product is set to ON for the first time, there are some basic settings to do before the product can start to operate. You must do a pairing operation of the product and the Automower® Connect app to install objects on the map, change the settings and operate the product. Use the Automower® Connect app on your mobile device. 1. Set the product to ON. Note: The Bluetooth® pairing operation mode of the product is enabled for 3 minutes. If the pairing operation between the product and the mobile device is not completed in 3 minutes, set the product to OFF and then set the product to ON. 2. Log on to your Husqvarna account in the Automower® Connect app. 3. Start Bluetooth® on your mobile device. 4. Select My mowers in the Automower® Connect app and add your product. 5. Enter the factory PIN code. 6. Do a pairing operation of the product and the charging station. 7. Do a pairing operation of the product and the reference station. 8. Set the docking point. 9. If GeoFence is to be used, select to enable the function. Note: It is only necessary to do a pairing operation of the Automower® Connect app and the product one time. 3.8.7 Installation of the map objects Read and understand the instructions about where to install the map objects. Refer to To examine where to install the objects on the map on page 13. On the map you can install the objects that follow in the Automower® Connect app: • Work areas (A) • Stay-out zones (B) • Transport path (C) • Charging station (D) • Maintenance point (E) • Reference station (F) • Work area, Secondary area (G) A B F C G D E A For a complete map installation, you must install a work area and a charging station on the map. 1970 - 001 - 10.10.2022 Installation - 15
-
 1
1 -
2
-
3
-
4
-
5
-
6
-
7
-
8
-
9
-
 10
10 -
 11
11 -
 12
12 -
 13
13 -
 14
14 -
 15
15 -
 16
16 -
 17
17 -
 18
18 -
 19
19 -
 20
20 -
21
-
22
-
23
-
24
-
25
-
26
-
27
-
28
-
29
-
30
-
31
-
32
-
33
-
34
-
35
-
36
-
37
-
38
-
39
-
40
-
41
-
42
-
43
-
44
 |
 |
