Husqvarna HUV4414G Owners Manual - Page 42
Gearcase Lubrication, Lubrication Level Check – Front Differential and Rear Transaxle
 |
View all Husqvarna HUV4414G manuals
Add to My Manuals
Save this manual to your list of manuals |
Page 42 highlights
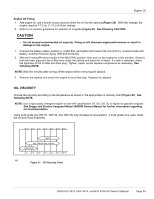
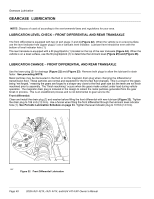
Gearcase Lubrication GEARCASE LUBRICATION NOTE: Dispose of used oil according to the environmental laws and regulations for your area. LUBRICATION LEVEL CHECK - FRONT DIFFERENTIAL AND REAR TRANSAXLE The front differential is equipped with two oil port plugs (1 and 2) (Figure 22). When the vehicle is on a level surface, use the level indicator hole (upper plug) (1) as a lubricant level indicator. Lubricant level should be even with the bottom of level indicator hole (1). The rear transaxle is equipped with a fill plug/dipstick (1) located on the top of the rear transaxle (Figure 24). When the vehicle is on a level surface, use the fill plug/dipstick (1) to determine the lubricant level (Figure 25) and (Figure 26). LUBRICATION CHANGE - FRONT DIFFERENTIAL AND REAR TRANSAXLE Use the lower plug (2) for drainage (Figure 22) and (Figure 23). Remove both plugs to allow the lubricant to drain faster. See preceding NOTE. Metal particles may be discovered in the fluid or on the magnetic drain plug when changing the differential or transmission fluid. These particles are normal and expected for the first few fluid changes. This is a result of the gears being "net forged," meaning the gears are forged to a shape very close to the final gear size but the teeth are not finish machined prior to assembly. The "finish machining" occurs when the gears make contact under load during vehicle operation. The magnetic drain plug is included in the design to collect the metal particles generated from the gear break in process. This is an established process and is not detrimental to gear service life. Front differential: Clean and install the drain plug (2) and washer before filling the front differential with new lubricant (Figure 22). Tighten the drain plug to 106 in-lb (12 N·m). Use a funnel when filling the front differential through the lubricant level indicator hole (1). See Periodic Lubrication Schedule on page 33. Tighten the level indicator plug to 10 ft-lb (14 N·m). 2 1 807 Figure 22 Front Differential Lubrication Page 40 2009 HUV 4214, HUV 4414, andHUV 4414-XP Owner's Manual
-
 1
1 -
2
-
3
-
4
-
5
-
6
-
7
-
8
-
9
-
10
-
11
-
12
-
13
-
14
-
15
-
16
-
17
-
18
-
19
-
20
-
21
-
22
-
23
-
24
-
25
-
26
-
27
-
28
-
29
-
30
-
31
-
32
-
33
-
34
-
35
-
36
-
 37
37 -
 38
38 -
 39
39 -
 40
40 -
 41
41 -
 42
42 -
 43
43 -
 44
44 -
 45
45 -
 46
46 -
 47
47 -
48
-
49
-
50
-
51
-
52
-
53
-
54
-
55
-
56
-
57
 |
 |
