IBM 8676 Installation Guide - Page 21
Working with adapters, Start Options, Startup Sequence Options - video
 |
UPC - 087944770107
View all IBM 8676 manuals
Add to My Manuals
Save this manual to your list of manuals |
Page 21 highlights
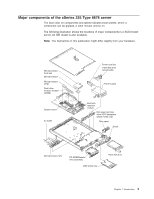
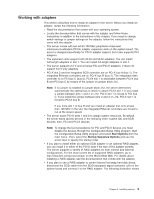
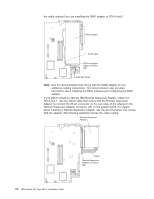
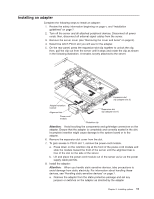
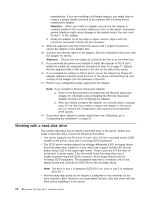
Working with adapters This section describes how to install an adapter in the server. Before you install an adapter, review the following information: v Read the documentation that comes with your operating system. v Locate the documentation that comes with the adapter and follow those instructions in addition to the instructions in this chapter. If you need to change switch settings or jumper settings on the adapter, follow the instructions that come with the adapter. v The server comes with two 64-bit 100 MHz peripheral component interconnect-extended (PCI-X) adapter expansion slots on the system board. The server is designed specifically for PCI-X adapter support, but it also supports PCI adapters. v The expansion slots support both 32-bit and 64-bit adapters. You can install half-length adapters in slot 1. You can install full-length adapters in slot 2. v The server supports 3.3 V and universal PCI and PCI-X adapters; it does not support 5.0 V-only adapters. v PCI-X slot 2 and the integrated SCSI controller are on PCI-X bus A (bus 1). The integrated Ethernet controllers are on PCI-X bus B (bus 2). The integrated video controller is on PCI bus C (bus 0). PCI-X slot 1 is switchable between PCI-X bus B and PCI bus C by means of the jumper on jumper block J12. Note: If no jumper is installed on jumper block J12, the server determines automatically the optimal bus to which to attach PCI-X slot 1. If you install a jumper between pins 1 and 2 on J12, PCI-X slot 1 is forced to PCI bus C. If you install the jumper between pins 2 and 3 on J12, PCI-X slot 1 is forced to PCI-X bus B. If you force slot 1 to bus B and you install an adapter that runs at less than 100 MHz in the slot, the integrated Ethernet controllers are forced to run at the slower speed. v The server scans PCI-X slots 1 and 2 to assign system resources. By default, the server starts (boots) devices in the following order: system IDE and SCSI devices; then, PCI and PCI-X devices. Note: To change the boot precedence for PCI and PCI-X devices you must disable the devices through the Configuration/Setup Utility program. Start the Configuration/Setup Utility program and select Start Options from the main menu. Then, select the Startup Sequence Options and use the arrow keys to specify the startup order. v If you plan to install either an optional SCSI adapter or an optional RAID adapter, you can install it in either of the PCI-X slots if the size of the adapter permits. The server supports a variety of RAID adapters for both internal and external configurations. For the most current list of supported RAID adapters, go to http://www.ibm.com/pc/us/compat/ on the World Wide Web. For details about installing a RAID adapter, see the documentation that comes with the adapter. v If you plan to use a RAID adapter to control internal hot-swap hard disk drives, disconnect the SCSI cable from the SCSI backplane signal connector (J8) on the system board and connect it to the RAID adapter. The following illustration shows Chapter 2. Installing options 9
-
 1
1 -
2
-
3
-
4
-
5
-
6
-
7
-
8
-
9
-
10
-
11
-
12
-
13
-
14
-
15
-
 16
16 -
 17
17 -
 18
18 -
 19
19 -
 20
20 -
 21
21 -
 22
22 -
 23
23 -
 24
24 -
 25
25 -
 26
26 -
27
-
28
-
29
-
30
-
31
-
32
-
33
-
34
-
35
-
36
-
37
-
38
-
39
-
40
-
41
-
42
-
43
-
44
-
45
-
46
-
47
-
48
-
49
-
50
-
51
-
52
-
53
-
54
-
55
-
56
-
57
-
58
-
59
-
60
-
61
-
62
-
63
-
64
-
65
-
66
-
67
-
68
-
69
-
70
-
71
-
72
-
73
-
74
-
75
-
76
-
77
-
78
-
79
-
80
-
81
-
82
-
83
-
84
-
85
-
86
-
87
-
88
-
89
-
90
-
91
-
92
 |
 |