Image Fitness 10.4qi Treadmill English Manual - Page 16
How To Use A Custom Program
 |
View all Image Fitness 10.4qi Treadmill manuals
Add to My Manuals
Save this manual to your list of manuals |
Page 16 highlights
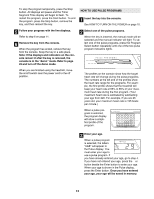
HOW TO USE A CUSTOM PROGRAM 1 Insert the key into the console. See HOW TO TURN ON THE POWER on page 10. 2 Select one of the custom programs. When the key is inserted, the manual mode will be selected and the manual indicator will light. To select one of the custom programs, press the Program Select button repeatedly until one of the two custom program indicators lights. When a custom program is selected, a ÒC1Ó or ÒC2Ó will appear in the program display. 3 Put on the heart rate monitor if desired. For the Pulse display to show your heart rate, the heart rate monitor must be worn. To put on the heart rate monitor, see HOW TO USE THE HEART RATE MONITOR on page 6. 4 Press the Start button. A moment after the button is pressed, the walking belt will begin to move. Hold the handrails and begin walking. Each custom program is divided into Current Period Column one-minute peri- ods. One speed setting and one in- cline setting are programmed for each period. The speed setting for the first period will be shown in the flashing Current Period column of the program display. (The incline settings are not shown in the program display.) The speed set- tings for the next seven periods will be shown in the seven columns to the right. When only three seconds remain in the first period of the program, both the Current Period column and the column to the right will flash, a series of tones will sound, and all speed settings will move one column to the left. The speed setting for the second period will then be shown in the flashing Current Period column and the treadmill will automatically adjust to the second speed and incline settings that you programmed previously. The program will continue until the speed setting for the last period is shown in the Current Period column and the Time/Segment Time display counts down to zero. The walking belt will then slow to a stop. Note: If the program is too easy or too difficult, the speed or incline setting for the current period can be adjusted with the Speed or Incline buttons. Adjustments will not be stored in memory. To reprogram the speed or incline setting for the current period, press the Record button. The custom program indicator will begin to flash. Speed and incline settings can be programmed only when the indicator is flashing. Adjust the speed or incline setting for the current period with the Speed or Incline buttons. After the period is completed, press the Record button again. The new setting will be stored in memory. To stop the program temporarily, press the Stop button. All displays will pause and the Time/ Segment Time display will begin to flash. To restart the program, press the Start button. To end the program, press the Stop button, remove the key, and then reinsert the key. 5 Follow your progress with the five displays. Refer to step 6 on page 11. 6 Remove the key from the console. When the program has ended, remove the key from the console. Keep the key in a safe place. Note: If the displays and indicators on the console remain lit after the key is removed, the console is in the ÒdemoÓ mode. Refer to page 22 and turn off the demo mode. When you are finished using the treadmill, move the on/off switch near the power cord to the off position. 16
-
 1
1 -
2
-
3
-
4
-
5
-
6
-
7
-
8
-
9
-
10
-
 11
11 -
 12
12 -
 13
13 -
 14
14 -
 15
15 -
 16
16 -
 17
17 -
 18
18 -
 19
19 -
 20
20 -
 21
21 -
22
-
23
-
24
-
25
-
26
-
27
-
28
-
29
-
30
-
31
-
32
-
33
-
34
 |
 |
