Image Fitness 12.2qi English Manual - Page 5
Assembly
 |
View all Image Fitness 12.2qi manuals
Add to My Manuals
Save this manual to your list of manuals |
Page 5 highlights
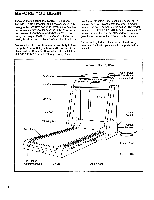
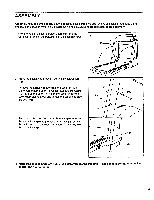
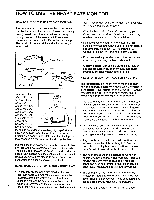
ASSEMBLY Assembly requires two people. Set the treadmill in a cleared area and remove all packing materials. Do not dispose of the packing materials until assembly is completed. No tools are required for assembly. 1. With the help of a second person, carefully raise the Uprights (115) until the treadmill is in the position shown. 1 115 2. Press the Lock Knob Sleeve (100) into the left Upright (115). Remove the Lock Knob (99) from the Lock Pin (103). Make sure that the Lock Pin Collar (102) and the Spring (101) are on the Lock Pin. Insert the Lock Pin into the Lock Knob Sleeve (100) and tighten the Lock Knob onto the Lock Pin. 2 115 99 100 3. Remove the backing from the Adhesive Clip (94). Press the Adhesive Clip onto the base of the Uprights (115) in 3 the indicated location. Press the Allen Wrench (95) into the Adhesive Clip. 94 101 102 103 115 95 4. Make sure that all parts are tightened before you use the treadmill. Place a mat under the treadmill to protect the floor or carpet. 5
-
 1
1 -
 2
2 -
 3
3 -
 4
4 -
 5
5 -
 6
6 -
 7
7 -
 8
8 -
 9
9 -
 10
10 -
 11
11 -
12
-
13
-
14
-
15
-
16
-
17
-
18
-
19
-
20
-
21
-
22
-
23
-
24
-
25
-
26
 |
 |
