Insignia IS-HTIB102732 User Manual (English) - Page 17
Digital Output, Speaker Setup, Progressive Scan, Video
 |
View all Insignia IS-HTIB102732 manuals
Add to My Manuals
Save this manual to your list of manuals |
Page 17 highlights
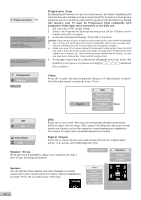
The setting will change to Progressive Scan ON. Incorrect setting of this item can distort the picture or no video can be observed after proceeding this step. To retrieve correct video output, you can press V.SELECT key several times. Do you want to continue? No, switch to Component output. Yes, switch to Progressive Scan output. Does your TV support Progressive Scan mode? and Have you connected the Component Video Output cable to your TV and your TV has set up accordingly? No Yes Progressive Scan By displaying all the lines of a picture simultaneous (instead of displaying odd and even lines alternatively such as a conventional TV), Progressive Scan greatly enhances picture resolution while minimizing distortion and flickering. To use this feature, your TV must be Progressive Scan compatible with Component Video input jacks connected to the DVD unit. 1. Set your unit to PAL output mode. 2. Select the Progressive Scan option and press OK (or V.Select on the remote control) to activate. 3. A caution message will display. Press OK to continue. Caution: If you see distorted or no picture after pressed OK, then check the following: i) Your TV may not be Progressive Scan compatible. Wait a few seconds and the unit will have return to the previous setting before change. ii) Make sure your TV is connected with Component Video output from the DVD unit and is now switched to view such input through which Progressive Scan signals are transmitted . There will be no video signal from AV output, in case you have both Component Video and AV connections. 4. A message requesting for confirmation will appear on screen. Select Yes (confirm) or No (return to previous setting) by and press OK to confirm. Component S-Video SOUND Video Press OK to select between Component Output or S-Video Output to match the DVD video output connected to your TV set. Sound DRC Digital Output Speaker Setup PL II Mode PL II Control Music Off DRC Press OK to turn on/off. This controls the Dynamic Range Compression On (DRC) for night time listening. DRC reduces the difference between normal voices and sounds such as like explosion to avoid waking your neighbours. The amount of range control available depends on the disc. Digital Output Press OK to check the box if you have connected the unit's digital audio output to a receiver with Dolby Digital or DTS. Speaker Setup Three options are available to adjust your speakers setting to best fit your listening environment. Speakers You can indicate the presence and size of speakers you have connected to your system within this menu. Options available are as below. Press OK to confirm your selections. Front Center Subwoofer Surround Surround Back Front Speaker Size GB 16
-
 1
1 -
2
-
3
-
4
-
5
-
6
-
7
-
8
-
9
-
10
-
11
-
 12
12 -
 13
13 -
 14
14 -
 15
15 -
 16
16 -
 17
17 -
 18
18 -
 19
19 -
 20
20 -
 21
21 -
 22
22 -
23
-
24
-
25
-
26
-
27
-
28
-
29
-
30
-
31
-
32
-
33
-
34
-
35
-
36
-
37
-
38
-
39
-
40
-
41
-
42
-
43
 |
 |
