Insignia NS-HTVMF0C User Manual - Page 10
STEP 5, You'll need, Option 1: Installing on a wood stud* wall
 |
View all Insignia NS-HTVMF0C manuals
Add to My Manuals
Save this manual to your list of manuals |
Page 10 highlights
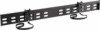
NS-HTVMF0C STEP 5 - Option 1: Installing on a wood stud* wall Note: Any drywall covering the wall must not exceed 5/8 in. (16 mm). 1 Locate the stud. Verify the center of the stud with an edge-to-edge stud finder. 2 Align the center of the wall plate template (R) at the height (a + b - 1.5 in.) you determined in the previous step, make sure that it is level, then tape it to the wall. 3 Drill two pilot holes through the template to a depth of 3 in. (75 mm) using a 7/32 in. (5.5 mm) diameter drill bit, then remove the template. 4 Align the wall plate (10) with the pilot holes, insert the lag bolts (11) through the lag bolt washers (12), then through the holes in the wall plate. Tighten the lag bolts only until they are firm against the wall plate. CAUTION: • Use only the upper slotted holes to mount the wall plate. Do not use the lower slotted holes. • Install in the center of the studs. Do Not install in drywall alone. • DO NOT over-tighten the lag bolts (11). * Minimum wood stud size: common 2 x 4 in. (51 x 102 mm) nominal 11/2 x 31/2 in. (38 x 89 mm). * Minimum horizontal spacing between fasteners cannot be less than 16 in. (406 mm). Align the center of the template with the height mark (a+b) you made in step 4. 3 in. 75 mm) You'll need Wall plate (10) Level 10 Wall plate template (R) Edge-to edge Drill stud finder 1/2 in. socket 12 (2) wrench Tape 11 (2) 7/32 in. wood drill bit www.insigniaproducts.com
-
 1
1 -
2
-
3
-
4
-
 5
5 -
 6
6 -
 7
7 -
 8
8 -
 9
9 -
 10
10 -
 11
11 -
 12
12 -
 13
13 -
 14
14 -
 15
15 -
16
 |
 |
