Insignia NS-HTVMM1703-C User Guide - Page 8
STEP 3 - Option 2: Attaching the mounting hardware to TVs with irregular or obstructed backs
 |
View all Insignia NS-HTVMM1703-C manuals
Add to My Manuals
Save this manual to your list of manuals |
Page 8 highlights
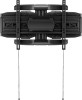
NS-HTVMM1703-C STEP 3 - Option 2: Attaching the mounting hardware to TVs with irregular or obstructed backs 1 Place spacers (A10) over the holes on the back of the TV. 2 Align the left and right TV brackets with the screw holes on the back of the TV. Make sure that the brackets are level. 3 Place washers (A11 or A12) over the holes in the TV brackets. Insert screws (A2, A4, A6, A8, or A9) through the washers, TV brackets, and spacers. 4 Tighten the screws until they are snug against the TV brackets. Do not over tighten. A10 A11 A2, A4, or A12 A6, A8 or A9 TV brackets You'll need Screws or A2 (4) or A4 (4) or or or A8 (4) A9 (4) Spacers A6 (4) Washers A10 (4) Magnetic removable bubble level or A11 (4) A12 (4) Phillips screwdriver TV brackets (2) 8 www.insigniaproducts.com
-
 1
1 -
2
-
 3
3 -
 4
4 -
 5
5 -
 6
6 -
 7
7 -
 8
8 -
 9
9 -
 10
10 -
 11
11 -
 12
12 -
 13
13 -
14
-
15
-
16
-
17
-
18
-
19
 |
 |
