Insignia NS-PMM6230 User Guide
Insignia NS-PMM6230 Manual
 |
View all Insignia NS-PMM6230 manuals
Add to My Manuals
Save this manual to your list of manuals |
Insignia NS-PMM6230 manual content summary:
- Insignia NS-PMM6230 | User Guide - Page 1
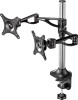
ASSEMBLY GUIDE Dual Screen Desktop Monitor Mount NS-PMM6230 Before using your new product, please read these instructions to prevent any damage. - Insignia NS-PMM6230 | User Guide - Page 2
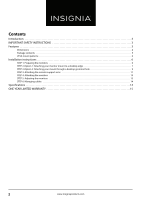
5 VESA mount patterns 6 Installation instructions 6 STEP 1: Preparing the monitors 6 STEP 2-Option 1: Attaching your monitor mount to a desktop edge 7 STEP 2-Option 2: Attaching your mount through a desktop grommet hole 9 STEP 3: Attaching the monitor support arms 11 STEP 4: Attaching the - Insignia NS-PMM6230 | User Guide - Page 3
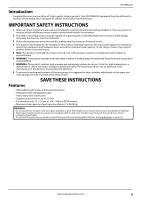
is designed for reliable and trouble-free performance. IMPORTANT SAFETY INSTRUCTIONS 1 Make sure these instructions are read and completely to be installed on desk. Before installing, make sure the mount will support the combined load of the equipment and hardware. Never exceed the maximum load - Insignia NS-PMM6230 | User Guide - Page 4
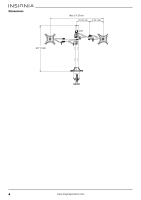
Dimensions 20.1" (51 cm) Max. 27.6" (70 cm) 6" (15.1 cm) 6" (15.1 cm) ±90° 4 www.insigniaproducts.com - Insignia NS-PMM6230 | User Guide - Page 5
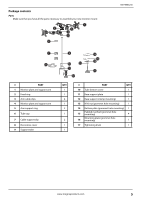
your new monitor mount: NS-PMM6230 # PART 1 Monitor plate and support arm 2 Fixed ring 3 Arm cable clips 4 Monitor plate and support arm 5 Arm support ring 6 Tube cap 7 Cable support clip 8 Decorative cover 9 Support tube QTY. 1 1 4 1 2 1 2 1 1 # PART QTY. 10 Tube bottom cover 1 11 - Insignia NS-PMM6230 | User Guide - Page 6
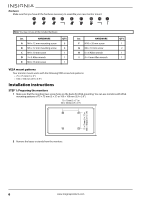
1 VESA mount patterns Your monitor mount works with the following VESA screw hole patterns: • 75 × 75 mm (3 × 3") • 100 × 100 mm (3.9 × 3.9") Installation instructions STEP 1: Preparing the monitors 1 Make sure that the monitors have screw holes on the backs for VESA mounting. You can use monitors - Insignia NS-PMM6230 | User Guide - Page 7
bear the weight of your monitor. Note: You need a Phillips screwdriver for this step. 1 Insert the tube bottom cover (10) into the base support plate (11), then insert the support tube (9) into the tube bottom cover. Make sure that the holes on the bottom cover and the plate are aligned. Secure the - Insignia NS-PMM6230 | User Guide - Page 8
tighten the screws with the 4 × 4 Allen wrench (I). 4 Slide the decorative cover (8) all the way down the support tube until it covers the base support plate. 5 Loosen the knob on the bottom of the base support, slide the clamp assembly onto the edge of the desk, then tighten the knob. Make sure - Insignia NS-PMM6230 | User Guide - Page 9
or lid. 2 Use the 4 × 4 Allen wrench (I) to remove the four screws on the base support plate (11), then remove the bottom plate. 3 Insert the tube bottom cover (10) in the base support plate, then insert the support tube (9) into the tube bottom cover. Make sure that the holes on the bottom cover - Insignia NS-PMM6230 | User Guide - Page 10
4 Slide the decorative cover (8) all the way down the support tube until it covers the base support plate. 5 Attach the bottom plate (14) to the bottom of the base plate using the four screws you removed in step 1. 6 Cover the screw heads - Insignia NS-PMM6230 | User Guide - Page 11
curved portions of the arm are pointed down. Tighten the arm knob to secure the arm. 3 Slide the fixed ring (2) onto the support tube just above the arm support you installed in step 2. Use a Phillips screwdriver to tighten the screw in the ring to hold the ring in place. www.insigniaproducts.com - Insignia NS-PMM6230 | User Guide - Page 12
in the ring to hold the ring in place. 6 Tighten the arm knob to secure the arm. 7 Install the tube cap (6) on top of the support tube using the M4 x 10 mm screw (C), then tighten the screw with the 3 × 3 mm Allen wrench (D). 12 www.insigniaproducts.com - Insignia NS-PMM6230 | User Guide - Page 13
NS-PMM6230 STEP 4: Attaching the monitors Depending on the VESA screw holes on the back of your monitors, you need to use the M4 × 12 mm mounting screws (A) or M5 × 12 mm mounting screws (B). 1 Determine which mounting screws you need (A or B) by hand-threading a screw in a VESA screw hole. Do not - Insignia NS-PMM6230 | User Guide - Page 14
in place with the arm cable clips (3). 2 Align the cables to the back side of the support tube, then secure them in place with the cable support clips (7). Specifications Monitor size Max load capacity Support tube height Tilt angle Integrated cable management 10 to 27 inch monitors 17.6 lb. (8 kg - Insignia NS-PMM6230 | User Guide - Page 15
the same amount of protection as the original packaging. To obtain warranty service, in the United States and Canada call 1-877-467-4289. Food loss/spoilage due to failure of refrigerator or freezer • Customer instruction/education • Installation • Set up adjustments • Cosmetic damage • Damage due - Insignia NS-PMM6230 | User Guide - Page 16
For product inquiries, please contact us with the information below: 1-877-467-4289 www.insigniaproducts.com INSIGNIA is a trademark of Best Buy and its affiliated companies. Distributed by Best Buy Purchasing, LLC 7601 Penn Ave South, Richfield, MN 55423 U.S.A. ©2019 Best Buy. All rights reserved.
-
 1
1 -
 2
2 -
 3
3 -
 4
4 -
 5
5 -
 6
6 -
 7
7 -
8
-
9
-
10
-
11
-
12
-
13
-
14
-
15
-
16
 |
 |
Before using your new product, please read these instructions to prevent any damage.
ASSEMBLY GUIDE
Dual Screen Desktop
Monitor Mount
NS-PMM6230