Insignia NS-PMM6230 User Guide - Page 13
STEP 4: Attaching the monitors
 |
View all Insignia NS-PMM6230 manuals
Add to My Manuals
Save this manual to your list of manuals |
Page 13 highlights
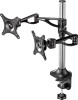
NS-PMM6230 STEP 4: Attaching the monitors Depending on the VESA screw holes on the back of your monitors, you need to use the M4 × 12 mm mounting screws (A) or M5 × 12 mm mounting screws (B). 1 Determine which mounting screws you need (A or B) by hand-threading a screw in a VESA screw hole. Do not force the screw to fit. 2 Center the back of a monitor on the monitor plate and align the mounting holes on the monitor with the holes on the monitor plate. 3 Attach the monitor to the plate using four screws (A or B). Tighten the screws firmly but do not overtighten. OR STEP 5: Adjusting the monitors Note: Each arm extends 11.9 inch (30.2 cm) horizontally and 15.7 inches (40 cm) vertically. To avoid eye strain: • Position your monitors about an arm's length from your eyes. • Position your monitors so there is no glare on the screens from windows or light sources. • Tilt the screens up slightly. • If you cannot read the on-screen text when your monitor is positioned correctly, you should increase the text size instead of moving you or your monitors closer. • Use the 4 × 4 Allen wrench (I) to adjust the viewing angle of the monitors. To avoid injury, do not rotate the monitors backward. • If a monitor does not stay in place, use the 4 × 4 Allen wrench to tighten the monitor tension. • If a monitor arm does not stay in place, tighten the knob on the arm. www.insigniaproducts.com 13
-
 1
1 -
2
-
3
-
4
-
5
-
6
-
7
-
 8
8 -
 9
9 -
 10
10 -
 11
11 -
 12
12 -
 13
13 -
 14
14 -
 15
15 -
 16
16
 |
 |
