Insignia NS-PMM6230 User Guide - Page 6
VESA mount patterns, Installation instructions, STEP 1: Preparing the monitors
 |
View all Insignia NS-PMM6230 manuals
Add to My Manuals
Save this manual to your list of manuals |
Page 6 highlights
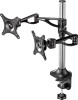
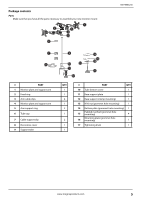
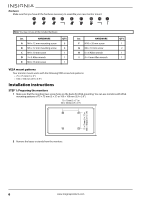
Hardware Make sure that you have all the hardware necessary to assemble your new monitor mount: Note: You may not use all the included hardware. Ltr. HARDWARE A M4 × 12 mm mounting screw B M5 × 12 mm mounting screw C M4 × 10 mm screw D 3 × 3 Allen wrench E M4 × 16 mm screw QTY. 8 8 1 1 1 Ltr. HARDWARE F M10 × 20 mm screw G M6 × 10 mm screw H 6 × 6 Allen wrench I 4 × 4 mm Allen wrench QTY. 1 2 1 1 VESA mount patterns Your monitor mount works with the following VESA screw hole patterns: • 75 × 75 mm (3 × 3") • 100 × 100 mm (3.9 × 3.9") Installation instructions STEP 1: Preparing the monitors 1 Make sure that the monitors have screw holes on the backs for VESA mounting. You can use monitors with VESA mounting patterns of 75 × 75 mm (3 × 3") or 100 × 100 mm (3.9 × 3.9"). 75 × 75 mm (3 × 3") or 100 × 100 mm (3.9 × 3.9") 75 × 75 mm (3 × 3") or 100 × 100 mm (3.9 × 3.9") 2 Remove the bases or stands from the monitors. 6 www.insigniaproducts.com
-
 1
1 -
 2
2 -
 3
3 -
 4
4 -
 5
5 -
 6
6 -
 7
7 -
 8
8 -
 9
9 -
 10
10 -
 11
11 -
 12
12 -
13
-
14
-
15
-
16
 |
 |
