Intel DH67CF English Product Guide - Page 41
Removing a PCI Express x16 Graphics Card,
 |
View all Intel DH67CF manuals
Add to My Manuals
Save this manual to your list of manuals |
Page 41 highlights
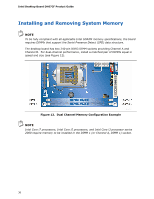
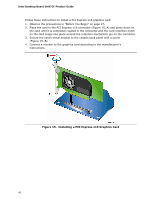
Installing and Replacing Desktop Board Components Removing a PCI Express x16 Graphics Card Follow these instructions to remove a PCI Express x16 graphics card from a connector: 1. Observe the precautions in "Before You Begin" on page 27. 2. Disconnect the monitor cable from the graphics card back panel connector. 3. Remove the screw (Figure 16, A) that secures the card's metal bracket to the chassis back panel. 4. Push the card ejector lever down using the tip of a pencil or similar tool (Figure 16, B) in the notch. This will release the card from the connector (C). 5. Pull the card straight up to remove it. Figure 16. Removing a PCI Express x16 Graphics Card 41
-
 1
1 -
2
-
3
-
4
-
5
-
6
-
7
-
8
-
9
-
10
-
11
-
12
-
13
-
14
-
15
-
16
-
17
-
18
-
19
-
20
-
21
-
22
-
23
-
24
-
25
-
26
-
27
-
28
-
29
-
30
-
31
-
32
-
33
-
34
-
35
-
 36
36 -
 37
37 -
 38
38 -
 39
39 -
 40
40 -
 41
41 -
 42
42 -
 43
43 -
 44
44 -
 45
45 -
 46
46 -
47
-
48
-
49
-
50
-
51
-
52
-
53
-
54
-
55
-
56
-
57
-
58
-
59
-
60
-
61
-
62
-
63
-
64
-
65
-
66
-
67
-
68
-
69
-
70
-
71
-
72
-
73
-
74
-
75
-
76
 |
 |
Installing and Replacing Desktop Board Components
41
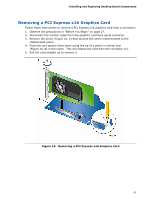
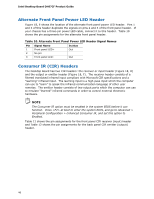
Removing a PCI Express x16 Graphics Card
Follow these instructions to remove a PCI Express x16 graphics card from a connector:
1.
Observe the precautions in "Before You Begin" on page 27.
2.
Disconnect the monitor cable from the graphics card back panel connector.
3.
Remove the screw (Figure 16, A) that secures the card’s metal bracket to the
chassis back panel.
4.
Push the card ejector lever down using the tip of a pencil or similar tool
(Figure 16, B) in the notch.
This will release the card from the connector (C).
5.
Pull the card straight up to remove it.
Figure 16.
Removing a PCI Express x16 Graphics Card