Intermec CK70 Intermec Terminal Emulator (ITE) User Guide - Page 50
Configuring Bar Code Symbology Settings, Session 1, Barcode Parms
 |
View all Intermec CK70 manuals
Add to My Manuals
Save this manual to your list of manuals |
Page 50 highlights
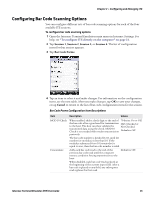
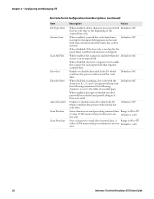
Chapter 2 - Configuring and Managing ITE Configuring Bar Code Symbology Settings In addition to global bar code scanning options, you can configure different decode settings for each of the bar code symbologies supported by ITE. You can change decode settings on a per-session basis. To configure bar code symbology settings 1 Open the Intermec Terminal Emulation main menu in Intermec Settings. For help, see "To configure ITE directly on the computer" on page 21. 2 Tap Session 1, Session 2, Session 3, or Session 4. The list of configuration items for that session appears. 3 Tap Barcode Parms. 4 Tap the name of the symbology in the Barcode Parms list. This example shows the list of settings for Code 39: For each symbology, you can configure settings as described in the next table. Bar Code Symbology Decode Settings Setting Scanner Type Drop Leading, Drop Trailing Fix Length 1, Fix Length 2, Fix Length 3, Fix Length 4 Min Length, Max Length Description Value Enables or disables decoding of the symbology. Enabled or Disabled. Default is Disabled. Number of characters to drop from the 0 to 15. front (leading) or rear (trailing) edge of the Default is 0. bar code. For more information on how this value affects EAN and UPC, see "About EAN/ UPC Drop Leading and Drop Trailing Values" on page 41. Sets the value for fixed length 1, 2, 3, or 4. 0 to 99. Fixed-length values override the maximum Default is 0. and minimum length entries. If fixed lengths are not necessary, enter a value of 0 (zero). Set the value for minimum or maximum 0 to 99. length of the bar code symbology. For Default is 0. more information, see "Setting Bar Code Lengths" on page 40. 38 Intermec Terminal Emulator (ITE) User Guide
-
 1
1 -
2
-
3
-
4
-
5
-
6
-
7
-
8
-
9
-
10
-
11
-
12
-
13
-
14
-
15
-
16
-
17
-
18
-
19
-
20
-
21
-
22
-
23
-
24
-
25
-
26
-
27
-
28
-
29
-
30
-
31
-
32
-
33
-
34
-
35
-
36
-
37
-
38
-
39
-
40
-
41
-
42
-
43
-
44
-
 45
45 -
 46
46 -
 47
47 -
 48
48 -
 49
49 -
 50
50 -
 51
51 -
 52
52 -
 53
53 -
 54
54 -
 55
55 -
56
-
57
-
58
-
59
-
60
-
61
-
62
-
63
-
64
-
65
-
66
-
67
-
68
-
69
-
70
-
71
-
72
-
73
-
74
-
75
-
76
-
77
-
78
-
79
-
80
-
81
-
82
-
83
-
84
-
85
-
86
-
87
-
88
-
89
-
90
-
91
-
92
-
93
-
94
-
95
-
96
-
97
-
98
-
99
-
100
-
101
-
102
-
103
-
104
-
105
-
106
-
107
-
108
-
109
-
110
-
111
-
112
-
113
-
114
-
115
-
116
-
117
-
118
-
119
-
120
-
121
-
122
-
123
-
124
-
125
-
126
-
127
-
128
-
129
-
130
-
131
-
132
-
133
-
134
-
135
-
136
-
137
-
138
-
139
-
140
-
141
-
142
-
143
-
144
-
145
-
146
-
147
-
148
-
149
-
150
-
151
-
152
-
153
-
154
-
155
-
156
-
157
-
158
-
159
-
160
-
161
-
162
-
163
-
164
-
165
-
166
-
167
-
168
-
169
-
170
-
171
-
172
-
173
-
174
-
175
-
176
-
177
-
178
-
179
-
180
-
181
-
182
-
183
-
184
-
185
-
186
-
187
-
188
-
189
-
190
-
191
-
192
-
193
-
194
-
195
-
196
-
197
-
198
-
199
-
200
-
201
-
202
-
203
-
204
-
205
-
206
-
207
-
208
-
209
-
210
-
211
-
212
-
213
-
214
-
215
-
216
-
217
-
218
-
219
-
220
 |
 |
