Intermec CK71 Intermec Terminal Emulator (ITE) User Guide - Page 43
Installing Certificate Files, Configuring ITE for SSH
 |
View all Intermec CK71 manuals
Add to My Manuals
Save this manual to your list of manuals |
Page 43 highlights
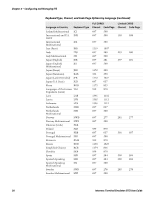
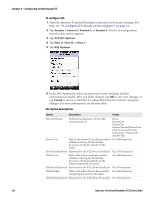
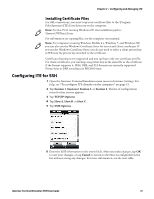
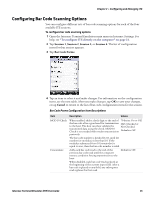
Chapter 2 - Configuring and Managing ITE Installing Certificate Files For SSL connections, you must copy your certificate files to the \Program Files\Intermec\ITE\Certs directory on the computer. Note: For the CV41 running Windows CE, the installation path is \System\ITEData\Certs. For information on copying files, see the computer user manual. Note: For computers running Windows Mobile 6.x, Windows 7, and Windows XP, you can also use the Windows Certificate Store for server and client certificates. If you use the Windows Certificate Store, you do not need to select a client private key, as ITE uses the private key attached to the certificate. Certificate chaining is not supported and you can have only one certificate per file. For client certificates, you can keep one private key in the same file as the certificate if the format supports it. PEM, DER, and P12 formats are currently supported. Private keys in DER encoding use PKCS8 format. Configuring ITE for SSH 1 Open the Intermec Terminal Emulation main menu in Intermec Settings. For help, see "To configure ITE directly on the computer" on page 21. 2 Tap Session 1, Session 2, Session 3, or Session 4. The list of configuration items for that session appears. 3 Tap TCP/IP Options. 4 Tap Host A, Host B, or Host C. 5 Tap SSH Options. 6 Enter the SSH information in the entry fields. After you make changes, tap OK to save your changes, or tap Cancel to return to the Host A configurable items list without saving any changes. For more information, see the next table. Intermec Terminal Emulator (ITE) User Guide 31
-
 1
1 -
2
-
3
-
4
-
5
-
6
-
7
-
8
-
9
-
10
-
11
-
12
-
13
-
14
-
15
-
16
-
17
-
18
-
19
-
20
-
21
-
22
-
23
-
24
-
25
-
26
-
27
-
28
-
29
-
30
-
31
-
32
-
33
-
34
-
35
-
36
-
37
-
 38
38 -
 39
39 -
 40
40 -
 41
41 -
 42
42 -
 43
43 -
 44
44 -
 45
45 -
 46
46 -
 47
47 -
 48
48 -
49
-
50
-
51
-
52
-
53
-
54
-
55
-
56
-
57
-
58
-
59
-
60
-
61
-
62
-
63
-
64
-
65
-
66
-
67
-
68
-
69
-
70
-
71
-
72
-
73
-
74
-
75
-
76
-
77
-
78
-
79
-
80
-
81
-
82
-
83
-
84
-
85
-
86
-
87
-
88
-
89
-
90
-
91
-
92
-
93
-
94
-
95
-
96
-
97
-
98
-
99
-
100
-
101
-
102
-
103
-
104
-
105
-
106
-
107
-
108
-
109
-
110
-
111
-
112
-
113
-
114
-
115
-
116
-
117
-
118
-
119
-
120
-
121
-
122
-
123
-
124
-
125
-
126
-
127
-
128
-
129
-
130
-
131
-
132
-
133
-
134
-
135
-
136
-
137
-
138
-
139
-
140
-
141
-
142
-
143
-
144
-
145
-
146
-
147
-
148
-
149
-
150
-
151
-
152
-
153
-
154
-
155
-
156
-
157
-
158
-
159
-
160
-
161
-
162
-
163
-
164
-
165
-
166
-
167
-
168
-
169
-
170
-
171
-
172
-
173
-
174
-
175
-
176
-
177
-
178
-
179
-
180
-
181
-
182
-
183
-
184
-
185
-
186
-
187
-
188
-
189
-
190
-
191
-
192
-
193
-
194
-
195
-
196
-
197
-
198
-
199
-
200
-
201
-
202
-
203
-
204
-
205
-
206
-
207
-
208
-
209
-
210
-
211
-
212
-
213
-
214
-
215
-
216
-
217
-
218
-
219
-
220
 |
 |