Intermec CS40 Intermec Terminal Emulator (ITE) User Guide - Page 18
Launching ITE
 |
View all Intermec CS40 manuals
Add to My Manuals
Save this manual to your list of manuals |
Page 18 highlights
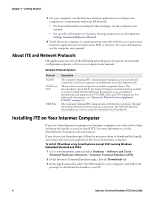
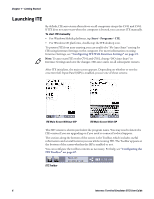
Chapter 1 - Getting Started Launching ITE By default, ITE auto-starts after reboot on all computers except the CV41 and CV61. If ITE does not auto-start when the computer is booted, you can start ITE manually. To start ITE manually • For Windows Mobile platforms, tap Start > Programs > ITE. • For Windows CE platforms, double-tap the ITE desktop icon. To prevent ITE from auto-starting, you can enable the "No Auto-Start" setting for ITE using Intermec Settings on the computer. For more information on using Intermec Settings, see "Configuring ITE With Intermec Settings" on page 21. Note: To auto-start ITE on the CV41 and CV61, change "NO Auto-Start" in Intermec Settings and save the changes. ITE auto-starts on all subsequent restarts. After ITE initializes, the main screen appears. Depending on whether or not the onscreen Soft Input Panel (SIP) is enabled, you see one of these screens: ITE Main Screen Without SIP ITE Main Screen With SIP The ITE version is shown just below the program name. You may need to know the ITE version if you are upgrading or if you need to contact Product Support. The section along the bottom of the screen is the Toolbar, which includes useful information and several buttons you use while running ITE. The Toolbar appears at the bottom of the screen whether the SIP is enabled or not. You can configure the toolbar contents as necessary. For help, see "Configuring the ITE Toolbar" on page 67. ITE Toolbar Term IP: 10.200.27.69 8:56 AM 6 Intermec Terminal Emulator (ITE) User Guide
-
 1
1 -
2
-
3
-
4
-
5
-
6
-
7
-
8
-
9
-
10
-
11
-
12
-
 13
13 -
 14
14 -
 15
15 -
 16
16 -
 17
17 -
 18
18 -
 19
19 -
 20
20 -
 21
21 -
 22
22 -
 23
23 -
24
-
25
-
26
-
27
-
28
-
29
-
30
-
31
-
32
-
33
-
34
-
35
-
36
-
37
-
38
-
39
-
40
-
41
-
42
-
43
-
44
-
45
-
46
-
47
-
48
-
49
-
50
-
51
-
52
-
53
-
54
-
55
-
56
-
57
-
58
-
59
-
60
-
61
-
62
-
63
-
64
-
65
-
66
-
67
-
68
-
69
-
70
-
71
-
72
-
73
-
74
-
75
-
76
-
77
-
78
-
79
-
80
-
81
-
82
-
83
-
84
-
85
-
86
-
87
-
88
-
89
-
90
-
91
-
92
-
93
-
94
-
95
-
96
-
97
-
98
-
99
-
100
-
101
-
102
-
103
-
104
-
105
-
106
-
107
-
108
-
109
-
110
-
111
-
112
-
113
-
114
-
115
-
116
-
117
-
118
-
119
-
120
-
121
-
122
-
123
-
124
-
125
-
126
-
127
-
128
-
129
-
130
-
131
-
132
-
133
-
134
-
135
-
136
-
137
-
138
-
139
-
140
-
141
-
142
-
143
-
144
-
145
-
146
-
147
-
148
-
149
-
150
-
151
-
152
-
153
-
154
-
155
-
156
-
157
-
158
-
159
-
160
-
161
-
162
-
163
-
164
-
165
-
166
-
167
-
168
-
169
-
170
-
171
-
172
-
173
-
174
-
175
-
176
-
177
-
178
-
179
-
180
-
181
-
182
-
183
-
184
-
185
-
186
-
187
-
188
-
189
-
190
-
191
-
192
-
193
-
194
-
195
-
196
-
197
-
198
-
199
-
200
-
201
-
202
-
203
-
204
-
205
-
206
-
207
-
208
-
209
-
210
-
211
-
212
-
213
-
214
-
215
-
216
-
217
-
218
-
219
-
220
 |
 |
