Intermec CS40 Intermec Terminal Emulator (ITE) User Guide - Page 47
Configuring Bar Code Scanning Options, Session 1, Bar Code Parms, Cancel
 |
View all Intermec CS40 manuals
Add to My Manuals
Save this manual to your list of manuals |
Page 47 highlights
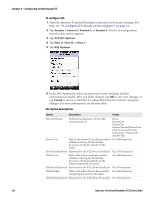
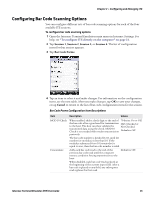
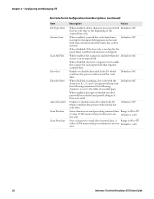
Chapter 2 - Configuring and Managing ITE Configuring Bar Code Scanning Options You can configure different sets of bar code scanning options for each of the four available ITE sessions. To configure bar code scanning options 1 Open the Intermec Terminal Emulation main menu in Intermec Settings. For help, see "To configure ITE directly on the computer" on page 21. 2 Tap Session 1, Session 2, Session 3, or Session 4. The list of configuration items for that session appears. 3 Tap Bar Code Parms. 4 Tap an item to select it and make changes. For information on the configuration items, see the next table. After you make changes, tap OK to save your changes, or tap Cancel to return to the list of bar code configuration items for the session. Bar Code Parms Configuration Item Descriptions Item Description Values MOD 10 Check Concatenate When enabled, adds a check digit to the end of 70 Series: On or Off. the bar code after a good read for transmission CK3: Checked or to the host. The host can then validate the Not Checked. transmitted data using the check. MOD 10 Check is not needed with modem transmission Default is Off. protocols. The bar code number is divided by 10, until the number (or modulus) is less than 10. If the modulus subtracted from 10 (remainder) is equal to zero, then the bar code number is valid. Adds each bar code read to the end of the previous bar code read until the computer meets a condition forcing transmission to the host. Default is Off. When disabled, each bar code read is placed at the beginning of the current input field. After a bar code is placed in any field, any subsequent read replaces the first read. Intermec Terminal Emulator (ITE) User Guide 35
-
 1
1 -
2
-
3
-
4
-
5
-
6
-
7
-
8
-
9
-
10
-
11
-
12
-
13
-
14
-
15
-
16
-
17
-
18
-
19
-
20
-
21
-
22
-
23
-
24
-
25
-
26
-
27
-
28
-
29
-
30
-
31
-
32
-
33
-
34
-
35
-
36
-
37
-
38
-
39
-
40
-
41
-
 42
42 -
 43
43 -
 44
44 -
 45
45 -
 46
46 -
 47
47 -
 48
48 -
 49
49 -
 50
50 -
 51
51 -
 52
52 -
53
-
54
-
55
-
56
-
57
-
58
-
59
-
60
-
61
-
62
-
63
-
64
-
65
-
66
-
67
-
68
-
69
-
70
-
71
-
72
-
73
-
74
-
75
-
76
-
77
-
78
-
79
-
80
-
81
-
82
-
83
-
84
-
85
-
86
-
87
-
88
-
89
-
90
-
91
-
92
-
93
-
94
-
95
-
96
-
97
-
98
-
99
-
100
-
101
-
102
-
103
-
104
-
105
-
106
-
107
-
108
-
109
-
110
-
111
-
112
-
113
-
114
-
115
-
116
-
117
-
118
-
119
-
120
-
121
-
122
-
123
-
124
-
125
-
126
-
127
-
128
-
129
-
130
-
131
-
132
-
133
-
134
-
135
-
136
-
137
-
138
-
139
-
140
-
141
-
142
-
143
-
144
-
145
-
146
-
147
-
148
-
149
-
150
-
151
-
152
-
153
-
154
-
155
-
156
-
157
-
158
-
159
-
160
-
161
-
162
-
163
-
164
-
165
-
166
-
167
-
168
-
169
-
170
-
171
-
172
-
173
-
174
-
175
-
176
-
177
-
178
-
179
-
180
-
181
-
182
-
183
-
184
-
185
-
186
-
187
-
188
-
189
-
190
-
191
-
192
-
193
-
194
-
195
-
196
-
197
-
198
-
199
-
200
-
201
-
202
-
203
-
204
-
205
-
206
-
207
-
208
-
209
-
210
-
211
-
212
-
213
-
214
-
215
-
216
-
217
-
218
-
219
-
220
 |
 |
