Invacare XLTPRO Owners Manual - Page 16
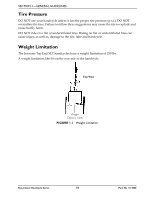
Percentage of Weight Distribution, Transferring Into/Out of the Handcycle
 |
View all Invacare XLTPRO manuals
Add to My Manuals
Save this manual to your list of manuals |
Page 16 highlights
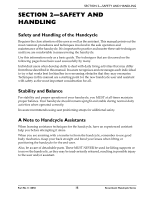
SECTION 2-SAFETY AND HANDLING Percentage of Weight Distribution Transferring in and out of the handcycle will cause a change to the normal balance, the center of gravity, and the weight distribution of the handcycle. To determine and establish your particular safety limits, practice transferring activities in several combinations in the presence of a qualified health care professional before attempting a transfer alone. Proper positioning is essential for your safety. Transferring Into/Out of the Handcycle ƽ WARNING Before attempting to transfer in or out of the handcycle, every precaution should be taken to reduce the gap distance. Position the XLT on level ground and as close as possible to the object you are transferring into or out of. The object you are transferring into or out of MUST also be secured before attempting any transfer. TOP END XLT, XLT JR. AND XLT GOLD MODELS ONLY - The parking brake of the handcycle MUST be engaged before attempting any transfer. TOP END XLT PRO MODEL ONLY - This model may be ordered with or without a parking brake. If ordered without a parking brake, the handcycle MUST be positioned securely against a stable object before any transfer is attempted. If ordered with the optional parking brake, the parking brake MUST be engaged before attempting any transfer. CAUTION When transferring, position yourself as far back as possible in the seat. This will prevent damage to the upholstery. NOTE: For this procedure, refer to FIGURE 2.1 on page 17. NOTE: This activity may be performed independently provided you have adequate mobility and upper body strength. 1. Position the handcycle on level ground and as close as possible along side the object to/from which you are transferring. 2. If possible, position the handcycle at a 45° angle to the object to/from which you are transferring. 3. If installed, apply the parking brake on the handcycle. 4. Position the handcycle handles as far forward as possible. This will create more room to transfer. NOTE: If necessary, lift the front wheel off the ground and rotate the front tire. 5. Secure object that you are transferring into or out of. Apply wheel locks (if installed) if the object is a handcycle. Recumbent Handcycle Series 16 Part No 1114850
-
 1
1 -
2
-
3
-
4
-
5
-
6
-
7
-
8
-
9
-
10
-
 11
11 -
 12
12 -
 13
13 -
 14
14 -
 15
15 -
 16
16 -
 17
17 -
 18
18 -
 19
19 -
 20
20 -
 21
21 -
22
-
23
-
24
-
25
-
26
-
27
-
28
-
29
-
30
-
31
-
32
-
33
-
34
-
35
-
36
-
37
-
38
-
39
-
40
-
41
-
42
-
43
-
44
-
45
-
46
-
47
-
48
-
49
-
50
-
51
-
52
-
53
-
54
-
55
-
56
-
57
-
58
-
59
-
60
-
61
-
62
-
63
-
64
-
65
-
66
-
67
-
68
-
69
-
70
-
71
-
72
-
73
-
74
-
75
-
76
 |
 |
