JVC CSDA1 Instructions - Page 10
Procedures for horizontal installation, the assembled mounting
 |
UPC - 046838031090
View all JVC CSDA1 manuals
Add to My Manuals
Save this manual to your list of manuals |
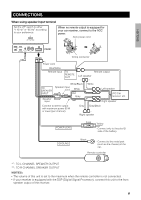
Page 10 highlights
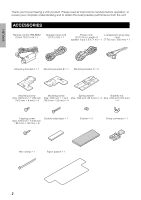
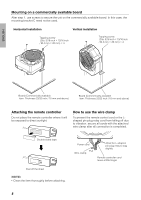
ENGLISH Procedures for horizontal installation 1 Mount mounting brackets A and B at the back of the unit Mounting bracket B Mounting screw (Dia. 7/32 inch c 11/32 inch / M 5 mm c 8 mm) c 4 Mount such that the letter ABB is at the bottom. Mounting bracket A Mount such that the letter AAB is at the bottom. 3 Make a hole in the carpet, place the assembled mounting brackets C below and secure with butterfly nuts Butterfly nut (Dia. 7/32 inch / M 5 mm) c 4 Spring washer (Dia. 7/32 inch / M 5 mm) c 4 Carpet etc. 2 Tighten screws on mounting bracket C and attach a cushion to it Mounting bracket C 1(218-193m/3m2 )inch Mounting bracket C (c2) assembled in step 2 1-1(2/88imncmh) Use a cutter to make 4 holes. • Use the paper pattern to determine the positions. Mounting screw (Dia. 7/32 inch c 1 inch / M 5 mm c 25 mm) c 2 Cushion Peel off the sheet • Assemble two mounting brackets C. CAUTION If the cushion is not attached to the mounting bracket C, you will hear a scrapping sound when the unit comes into contact with the car body as the car moves and vibrates. 6
-
 1
1 -
2
-
3
-
4
-
 5
5 -
 6
6 -
 7
7 -
 8
8 -
 9
9 -
 10
10 -
 11
11 -
 12
12 -
 13
13 -
 14
14 -
 15
15 -
16
-
17
-
18
-
19
-
20
-
21
-
22
-
23
-
24
-
25
-
26
-
27
-
28
-
29
-
30
-
31
-
32
-
33
-
34
-
35
-
36
-
37
-
38
-
39
-
40
-
41
-
42
-
43
-
44
-
45
-
46
-
47
-
48
 |
 |
