JVC DLA-S15U DLA-S15U User instruction manual (2.1MB) - Page 22
Connecting to Devices which Control the Projector, Connecting to Other Devices
 |
View all JVC DLA-S15U manuals
Add to My Manuals
Save this manual to your list of manuals |
Page 22 highlights
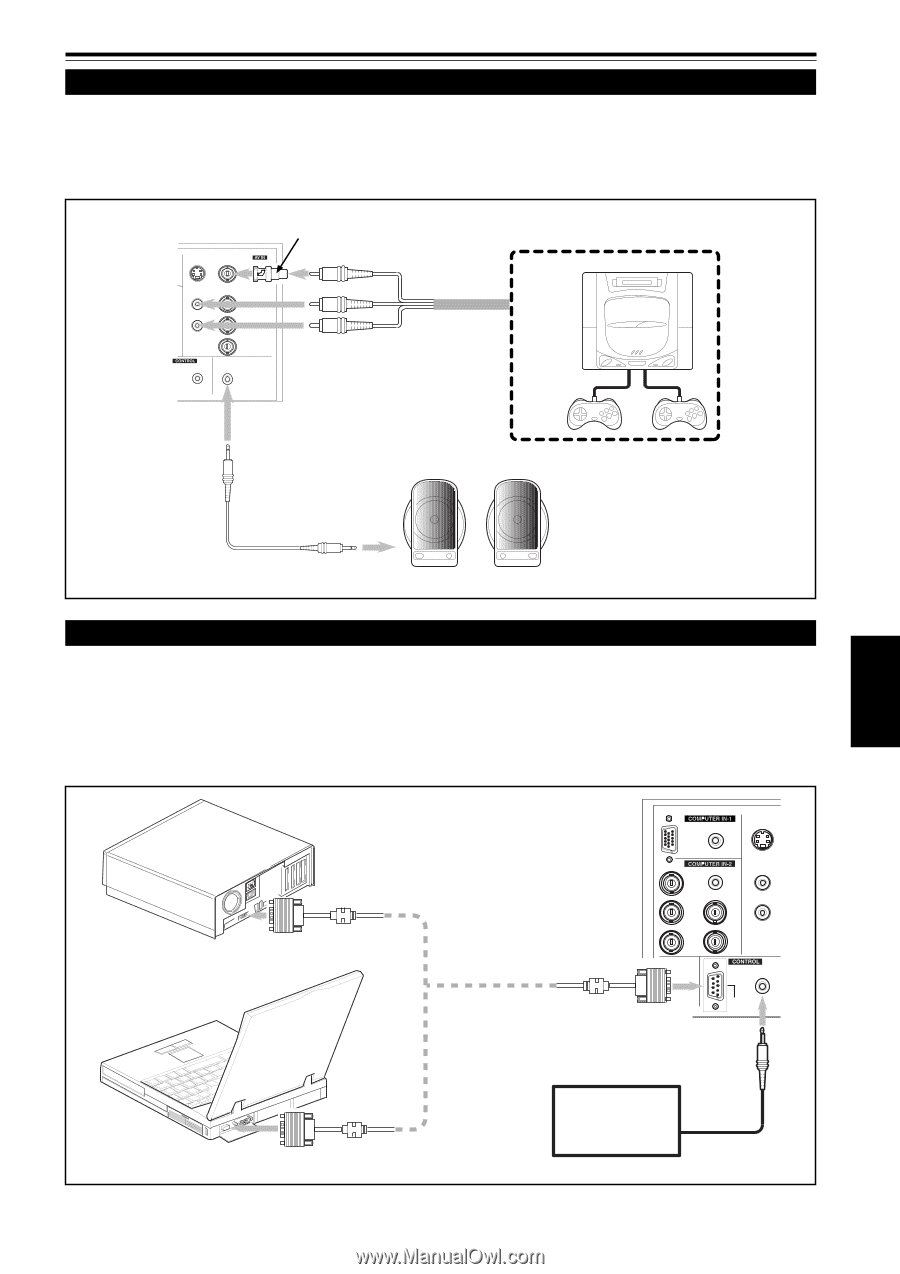
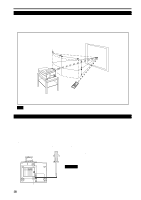
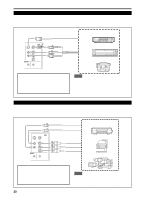
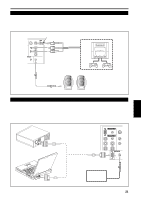
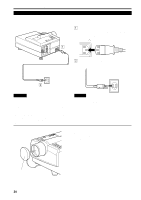
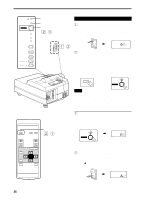
Connecting to Various Devices (Cont.) Connecting to Other Devices Before connection, be sure to turn off both the projector and other devices to be connected. • Read the manual thoroughly which comes with the device to be connected. • Speakers with a built-in amplifier and game devices can be connected. Use the AV connection cable and audio cable supplied, or the cable supplied with a game device. Y/C VIDEO AUDIO L Y R PB/B-Y PR/R-Y REMOTE AUDIO OUT RS-232C BNC-RCA conversion plug (supplied) To VIDEO • Game device, etc. To AUDIO (L) To AUDIO (R) Cable supplied with the game device, or supplied AV connection cable To AUDIO OUT • Speakers with a built-in amplifier ENGLISH Audio cable (supplied) (or stereo mini-plug) Connecting to Devices which Control the Projector Before connection, be sure to turn off both the projector and devices to be connected. • Read the manual thoroughly which comes with each device to be connected. • By connecting a computer to the RS-232C terminal, you can control the projector. Also, you can make an infrared remote sensor extension unit and connect it to the REMOTE terminal of the projector. * Obtain connection cables as required. * For details, consult a JVC-authorized your dealer or service center. • Desktop type Y/C AUDIO PC To RS-232C connector AUDIO R AUDIO L G H/CS R • Note type RS-232C reverse connection cable (separately available) B COMPUTER OUT V REMOTE To RS-232C connector RS-232C To REMOTE terminal To RS-232C connector Infrared remote sensor extension unit (Needs to be made) 21
-
 1
1 -
2
-
3
-
4
-
5
-
6
-
7
-
8
-
9
-
10
-
11
-
12
-
13
-
14
-
15
-
16
-
 17
17 -
 18
18 -
 19
19 -
 20
20 -
 21
21 -
 22
22 -
 23
23 -
 24
24 -
 25
25 -
 26
26 -
 27
27 -
28
-
29
-
30
-
31
-
32
-
33
-
34
-
35
-
36
-
37
-
38
-
39
-
40
-
41
-
42
-
43
-
44
-
45
-
46
-
47
-
48
-
49
-
50
-
51
-
52
-
53
-
54
-
55
-
56
-
57
-
58
-
59
-
60
-
61
-
62
-
63
-
64
-
65
-
66
-
67
-
68
-
69
-
70
-
71
-
72
-
73
-
74
-
75
-
76
-
77
-
78
-
79
-
80
-
81
-
82
-
83
-
84
-
85
-
86
-
87
-
88
-
89
-
90
-
91
-
92
-
93
-
94
-
95
-
96
-
97
-
98
-
99
-
100
-
101
-
102
-
103
-
104
-
105
-
106
-
107
-
108
-
109
-
110
-
111
-
112
-
113
-
114
-
115
-
116
-
117
-
118
 |
 |