JVC DT-V1710CGU Instruction Manual - Page 4
Controls And Features - 17
 |
UPC - 046838208102
View all JVC DT-V1710CGU manuals
Add to My Manuals
Save this manual to your list of manuals |
Page 4 highlights
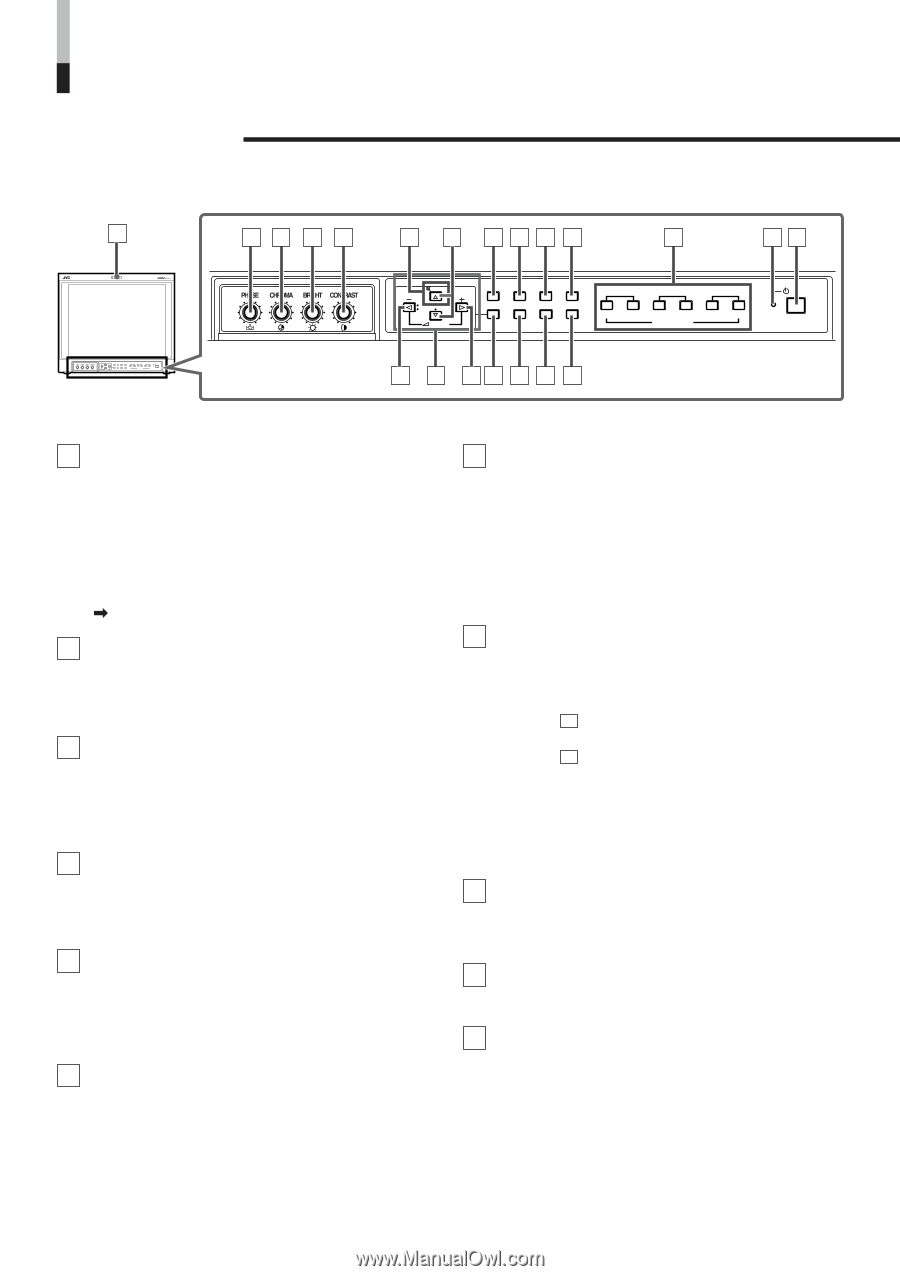
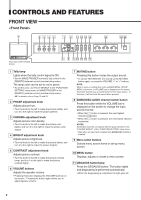
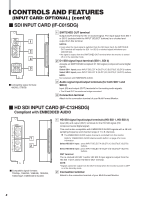
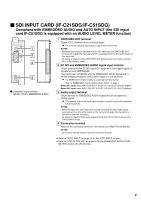
CONTROLS AND FEATURES FRONT VIEW 1 23 45 7 8 11 12 13 14 18 19 20 MUTING VOLUME UNDER DEGAUSS SCAN PULSE CROSS COLOR OFF MENU SCREENS ASPECT AREA CHECK MARKER SLOT 1 SLOT 2 SLOT 3 A B C D E F INPUT SELECT POWER (Front view of DT-V1910CG shown) MUTING VOLUME UNDER DEGAUSS SCAN PULSE CROSS COLOR OFF MENU SCREENS ASPECT AREA CHECK MARKER SLOT 1 SLOT 2 SLOT 3 A B C D E F INPUT SELECT 6 9 6 10 15 16 17 POWER 1 Tally lamp Lights when the tally control signal is ON. • Set the MAKE/TRIGGER terminal's tally control in the REMOTE (external control) terminal setup menu. The lamp color can be set to red or green. • To set the color, use TALLY SELECT in the "FUNCTION SETTING" setup menu or MAKE/TRIGGER in the REMOTE (external control) terminal setup menu. For details, refer to Page 19 and 23. 2 PHASE adjustment knob Adjusts picture hue. • Turn the knob to the left to make the picture redder, and turn it to the right to make the picture greener. 3 CHROMA adjustment knob Adjusts picture color density. • Turn the knob to the left to make the picture color lighter, and turn it to the right to make the picture color deeper. 4 BRIGHT adjustment knob Adjusts picture brightness. • Turn the knob to the left to make the picture darker, and turn it to the right to make the picture brighter. 5 CONTRAST adjustment knob Adjusts picture contrast. • Turn the knob to the left to make the picture contrast lower, and turn it to the right to make the picture contrast higher. 6 VOLUME buttons Adjusts the speaker volume. • Pressing this button displays the VOLUME level bar on the screen. Pressing the button again allows you to adjust speaker volume. ! ! 7 MUTING button Pressing this button mutes the output sound. • To cancel "MUTING ON" (no sound), press MUTING button again, or press the VOLUME "-" or "+" buttons. NOTE: When a menu or setting item (such as MAIN MENU, SETUP MENU, sub-menu, or VOLUME bar) is displayed on the screen, this button functions as a control button for the menu screen. In this case, it will not mute the sound when pressed. 8 EMBEDDED AUDIO channel switch button Press this button while the VOLUME bar is displayed on the screen to change the input sound channel. • When the button is pressed, the next highest channel is selected. • When the button is pressed, the next lowest channel is selected. NOTES: Switchable channels correspond with the group selected in the "E.AUDIO GROUP" of the "FUNCTION SETTING" setup menu. * Valid when an input card compliant with EMBEDDED AUDIO is installed. 9 Menu select buttons Selects menu screen items or set-up menu screen. 10 MENU button Displays, adjusts or closes a menu screen. 11 DEGAUSS button/lamp Press the DEGAUSS button. The button lights and degaussing is performed automatically. • When the degaussing is completed, the light goes off. 4
-
 1
1 -
 2
2 -
 3
3 -
 4
4 -
 5
5 -
 6
6 -
 7
7 -
 8
8 -
 9
9 -
 10
10 -
11
-
12
-
13
-
14
-
15
-
16
-
17
-
18
-
19
-
20
-
21
-
22
-
23
-
24
-
25
-
26
-
27
-
28
-
29
-
30
-
31
-
32
 |
 |