JVC GR D90U Instructions - Page 11
ATTENTION, MEMORY CARD, To Unload A Memory Card, VIDEO/DSC, MENU/VOLUME - no picture
 |
UPC - 046838161018
View all JVC GR D90U manuals
Add to My Manuals
Save this manual to your list of manuals |
Page 11 highlights
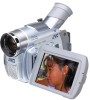
Loading A Memory Card (GR-D90/D70 only) The provided memory card (GR-D90 only) is already inserted in the camcorder when you receive the camcorder. 1 Make sure the camcorder's power is off. 2 Open the LCD monitor (੬ pg. 47, u Monitor Open Button), then open the card cover (MEMORY CARD) p. 3 Insert the memory card clipped edge first. • Do not touch the terminal on the reverse side of the label. 4 To close the card cover p, push it until you hear a click. To Unload A Memory Card: In step 3 push the memory card, which then comes out of the camcorder automatically. Pull it out and close the card cover p. u Picture Quality/Image Size Setting (GR-D90/D70 only) The Picture Quality/Image Size can be selected to best match your needs. Refer to the chart on page 18 for your selection. 1 Set the VIDEO/DSC Switch 4 to "DSC", then set the Power Switch y to " " while pressing down the Lock Button t located on the switch. The POWER/ CHARGE lamp r lights and the camcorder turns on. 2 Press the MENU/VOLUME wheel % in. The Menu Screen appears. 3 Rotate the MENU/VOLUME wheel % to select " (DSC)" and press it. 4 Rotate the MENU/VOLUME wheel % to select "QUALITY" and press it. The Sub Menu appears. Rotate the MENU/VOLUME wheel % to select the desired mode and press it. 5 Rotate the MENU/VOLUME wheel % to select "IMAGE SIZE" and press it. The Sub Menu appears. Rotate the MENU/VOLUME wheel % to select the desired mode and press it. 6 Rotate the MENU/VOLUME wheel % to select " RETURN", and press it twice. The Menu Screen closes. % p Label Clipped edge Memory card NOTES: ● Be sure to use only SD Memory Cards marked " " or MultiMediaCards marked " ". ● Some brands of memory cards are not compatible with this camcorder. Before purchasing a memory card , consult its manufacturer or dealer. ● Before using a new memory card, it is necessary to FORMAT the card. ੬ pg. 22. ATTENTION Do not insert/remove the memory card while the camcorder is turned on, as this may cause the memory card to be corrupted or cause the camcorder to become unable to recognize whether or not the card is installed. r ty Display DSC QUAL I TY - F I NE I MAGE S I ZE - 1024X768 REC SELECT- RETURN NOTE: In the 1024 x 768 mode, images are shot in 720 x 480 pixels and they are converted and stored in the 1024 x 768 file size. EN GETTING STARTED 11
-
 1
1 -
2
-
3
-
4
-
5
-
 6
6 -
 7
7 -
 8
8 -
 9
9 -
 10
10 -
 11
11 -
 12
12 -
 13
13 -
 14
14 -
 15
15 -
 16
16 -
17
-
18
-
19
-
20
-
21
-
22
-
23
-
24
-
25
-
26
-
27
-
28
-
29
-
30
-
31
-
32
-
33
-
34
-
35
-
36
-
37
-
38
-
39
-
40
-
41
-
42
-
43
-
44
-
45
-
46
-
47
-
48
-
49
-
50
-
51
-
52
-
53
-
54
-
55
-
56
 |
 |
